Recently @RuddyVCP (Blog | Twitter) and I worked on building a home lab to give away at the 2015 Indianapolis VMUG UserCon. The idea was we’d build a three node VSAN cluster using Intel NUC miniature PCs each with a 1TB 7200 RPM SATA disk and a 256GB M.2 SSD. Between Kyle and I we have plenty of content for a series of blog posts, as this was a much more challenging project than either of us initially assumed.
Today I want to write about the VSAN install, as it was part of a chicken vs. egg type discussion. Normally one would setup VSAN on a cluster from within vCenter. However, in our day-zero deployment we did not have a working vCenter yet, or a place to deploy the vCenter server. All of the local disks inside the NUCs needed to be claimed by the VSAN (three nodes with one SSD and one spinning disk are the bare minimum for VSAN), so we couldn’t use one of those disks as a temporary home for vCenter either. The catch was without vCenter we also couldn’t deploy VSAN… or could we? How can you setup VSAN without vCenter?
Our Technical Account Manager @eck79 (Blog | Twitter) pointed us at this gem of a document for just such an occasion. It covers using the shell to do just that — setup VSAN without vCenter for day-zero deployments: https://www.vmware.com/files/pdf/products/vsan/VMware-TechNote-Bootstrapping-VSAN-without-vCenter.pdf
This document is great… it covers the basics of VSAN and includes bootstrapping instructions using esxcli over SSH. I wanted to do a bit of testing to see if I could make this work from within PowerCLI. Here is some sample code that I tested on a handful of NUCs to do just that — enable VSAN without vCenter using PowerCLI.
Set-PowerCLIConfiguration -DefaultVIServerMode:Multiple -InvalidCertificateAction:Ignore -Confirm:$false

Connect-VIServer 192.168.1.31,192.168.1.32,192.168.1.33 -User root -Password My#1Passwo
Get-VMHostNetworkAdapter -Name vmk0 | Set-VMHostNetworkAdapter -VsanTrafficEnabled:$true -Confirm:$false

Get-VMHost | Sort Name | %{
$vmh = $_
$luns = Get-ScsiLun -VMHost $vmh -LunType disk | ?{$_.IsLocal -eq $true -AND $_.CapacityGB -gt 32} | select CanonicalName, @{N="SSD";E={$_.ExtensionData.Ssd}}, CapacityGB
$dataLun = ($luns | ?{$_.ssd -eq $false} ).CanonicalName
$ssdLun = ($luns | ?{$_.ssd -eq $true} ).CanonicalName

$thisEsxCli = $vmh | Get-EsxCli
$thisEsxCli.vsan.storage.add($dataLun,$ssdLun)

# On the first pass we need to get a new UUID, future passes will reuse the existing value
if (!$newVsanUUID) {$newVsanUUID = $thisEsxCli.system.uuid.get()}
$thisEsxCli.vsan.cluster.join($newVsanUUID)
}

$thisEsxCli.vsan.cluster.get()
Lets break this code down a bit. In the first couple of lines we are connecting to all three of the NUCs (which are already running ESXi 6.0). We then enable VSAN traffic on the existing management network/vmk0 interface. We could easily have created a new portgroup/vmkernel interface, perhaps on its own VLAN, but to keep this simple I used the existing interface. When using unsupported hardware, best practices take the backseat.
We then loop through all the hosts (the three we have connected to earlier) and for each host we select the pair of local disks. The where-object statement that picks out devices larger than 32GB is just excluding the USB drive that contains the boot image. Once we have the disks, we use Get-EsxCli to claim them for VSAN. Finally we use the first host in the loop to generate a new UUID for the VSAN cluster (subsequent hosts will reuse this value) and we add the hosts to the VSAN cluster. Pretty snazzy. Here are some screenshots showing some of the various output.
Here is where we enabled the VSAN traffic on each host:
Here you’ll see the code block that is selecting the disks, claiming them for VSAN (one true return per host) and then adding the host to the VSAN cluster (another true return for each host).
Here you can see the status of the cluster is healthy.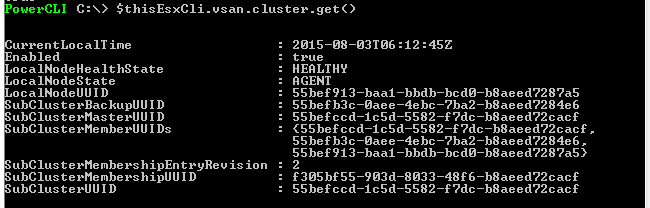
And finally, a screenshot showing the datastore is present — it appears three times, once per host.![]()