I’ve recently been interested in creating a TinyCore Linux virtual appliance. This OVA would allow for some customization, like hostname, IP address, default gateway, and DNS settings.
I’ve posted about TinyCore Linux before, most recently 2 years ago: https://enterpriseadmins.org/blog/scripting/tinycore-15-virtual-machine-very-small-vm-for-testing/. I really enjoy this very lightweight VM as it works perfectly for demos. In a very small (~28MB in this example) package, we can have a running virtual machine with VMware Tools.
I’ve recently started storing virtual machines that I need to deploy, like the Nested ESXi Fling, as OVAs in a content library. These OVAs are typically customized with OVF properties. I’ve never created my own OVA with custom properties, but found a great guide here: https://williamlam.com/2019/02/building-your-own-virtual-appliances-using-ovf-properties-part-1.html.
I wanted to take these steps and apply them to a TinyCore Linux appliance.
At a high level, this appliance works by exposing VMware OVF properties as guestinfo.* values. During boot, a startup script running inside TinyCore Linux reads those values through VMware Tools and applies the requested network and hostname configuration automatically.
Creating Virtual Machine
I started by creating a minimal virtual machine, with hardware compatibility going back to ESXi 7.0u2 and later (vmx-19), Other 5.x or later Linux (32-bit), 1vCPU, 1GB RAM, and configured the VM to boot using BIOS instead of EFI. I typically choose BIOS as I’ve had issues with VMs booting from the CD for the initial install with EFI.
In the VM, I installed TinyCore command line only to the entire disk. I then installed a few dependencies, copied a script from a webserver, and set that script to run when the system boots (by appending to the builtin /opt/bootlocal.sh script). Note: VMware Tools specifically are required for the mechanisms later in this post to function.
tce-load -wi curl pcre open-vm-tools
sudo wget http://www.example.com/build/tc-ova.txt -O /opt/tc-ova.sh
sudo chmod +x /opt/tc-ova.sh
echo "/opt/tc-ova.sh > /tmp/tc-ova-boot.log 2>&1" | sudo tee -a /opt/bootlocal.sh
echo y | backup
The tc-ova.txt file on my webserver (www.example.com) can be found on GitHub here: https://github.com/bwuch/code-snips/blob/master/build/tc-ova.txt. This file has a .txt extension, but that is so I don’t need to create a .sh mime type on my web server. The file is a generic shell script that retrieves OVF properties using VMware Tools and the vmtoolsd --cmd "info-get guestinfo.*" interface. It is renamed to have a .sh extension by the wget command. The script allows the guest operating system to read values provided during deployment without requiring cloud-init or additional provisioning frameworks. After reading those values, the script will apply them to set IP & subnet mask, default gateway, DNS servers, and hostname, if any of those values are found as OVF properties. By keeping all OVF properties optional, the appliance remains flexible. A deployment can use DHCP with minimal input, or fully specify static networking when needed.
Creating OVF Properties
The guide I used for initial setup (https://williamlam.com/2019/02/building-your-own-virtual-appliances-using-ovf-properties-part-1.html) shows how to create these OVF properties in the UI. I needed to create a handful of properties, with specific names, and was interested in setting some default values. While I could have done this in the UI, I decided to automate the creation of OVF properties with PowerCLI. The script below documents my property names in a CSV file embedded into the script, loops through them to apply them to the VM, and finally exports the VM as an OVA.
$applianceVersion = 'TinyCore_17.0_Appliance'
$vmName = 'h461-tinycore-01'

$ovfProperties = @"
Key,Label,Type,Description,DefaultValue
guestinfo.hostname,Hostname,string,Optional: Short hostname,
guestinfo.domain,DNS Domain,string,Optional: Will be appended to Hostname to set FQDN.,lab.enterpriseadmins.org
guestinfo.dns,DNS Server,string,Optional: Space or comma separated list of DNS servers,192.168.127.30 192.168.32.30
guestinfo.ipaddress,IP Address,string,Optional: IPv4 address to assign to VM
guestinfo.netmask,Netmask,string,"Optional: IPv4 Netmask, please specify if IP Address has been set."
guestinfo.gateway,Default Gateway,string,Optional: IPv4 default gateway
"@ | ConvertFrom-Csv


$spec = New-Object VMware.Vim.VirtualMachineConfigSpec         # Main VM config spec
$spec.vAppConfig = New-Object VMware.Vim.VmConfigSpec          # vApp config container

$propertySpecs = @()

$keyId = 0
foreach ($prop in $ovfProperties) {

    # Create property info object
    $propertyInfo = New-Object VMware.Vim.VAppPropertyInfo
    $propertyInfo.Key = $keyId
    $propertyInfo.Id = $prop.Key
    $propertyInfo.Category = "Guestinfo"
    $propertyInfo.Label = $prop.Label
    $propertyInfo.Type = $prop.Type
    $propertyInfo.DefaultValue = $prop.DefaultValue
    $propertyInfo.UserConfigurable = $true
    $propertyInfo.Description = $prop.Description

    # Create property spec wrapper
    $propertySpec = New-Object VMware.Vim.VAppPropertySpec
    $propertySpec.Operation = "add"
    $propertySpec.Info = $propertyInfo

    # Add to array
    $propertySpecs += $propertySpec
    $keyId++
}

# Attach property specs to vApp config
$spec.vAppConfig.Property = $propertySpecs

$spec.VAppConfig.Product = New-Object VMware.Vim.VAppProductSpec[] (1)
$spec.VAppConfig.Product[0] = New-Object VMware.Vim.VAppProductSpec
$spec.VAppConfig.Product[0].Operation = 'add'
$spec.VAppConfig.Product[0].Info = New-Object VMware.Vim.VAppProductInfo
$spec.VAppConfig.Product[0].Info.VendorUrl = 'http://tinycorelinux.net'
$spec.VAppConfig.Product[0].Info.Vendor = 'TinyCoreLinux'
$spec.VAppConfig.Product[0].Info.Name = $applianceVersion
$spec.VAppConfig.Product[0].Info.ProductUrl = 'http://tinycorelinux.net'
$spec.VAppConfig.Product[0].Info.Key = -1
$spec.VAppConfig.OvfEnvironmentTransport = New-Object String[] (1)
$spec.VAppConfig.OvfEnvironmentTransport[0] = 'com.vmware.guestInfo'

(Get-VM $vmName).ExtensionData.ReconfigVM_Task($spec)
Start-Sleep -Seconds 5  # allow the previous task to complete, we could make this more robust by checking for actual completion of previous task.
Get-VM $vmName | Export-VApp -Destination D:\tmp -Name $applianceVersion -Format:Ova -Description $applianceVersion
The resulting OVA file was very small, approximately 28MB on disk.
Testing the Deployment
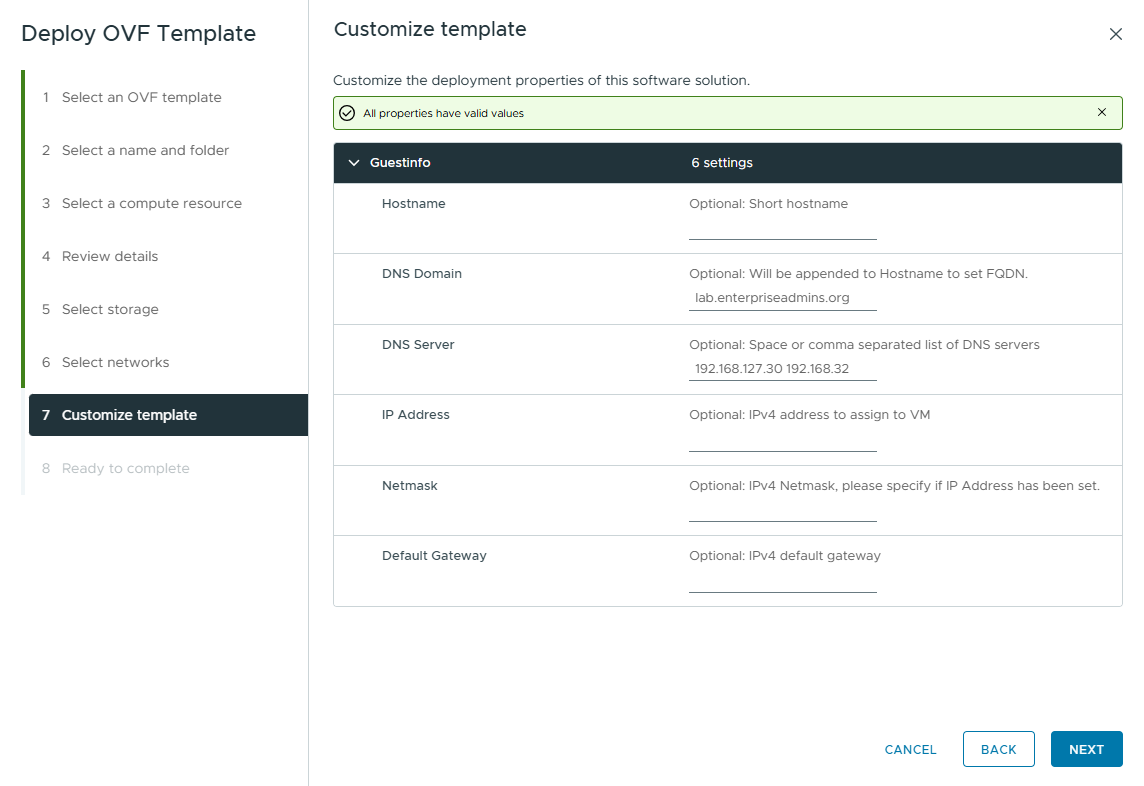
When deploying this appliance through the UI, all properties have valid values by default, since all fields are optional. I’ve confirmed that this works as expected and the VM gets its IP from DHCP and the host name is set to the default value (box).
For another test, I deployed the OVA using PowerCLI. I’ll include that script below as well.
$file="D:\tmp\TinyCore_17.0_Appliance.ova"
$vmName=   'h461-tinycore-03'

# Get OVF Config
$ovfConfig = Get-OvfConfiguration -Ovf $file

# Set OVF Properties
$ovfConfig.NetworkMapping.dvportgroup_34861.Value = '192.168.10.0'
$ovfConfig.common.guestinfo.hostname.value  = $vmName
$ovfConfig.common.guestinfo.ipaddress.value = '192.168.10.222'
$ovfConfig.common.guestinfo.netmask.value   = '255.255.255.0'
$ovfConfig.common.guestinfo.gateway.value   = '192.168.10.1'

$newVmSettings = @{
  Source            = $file
  OvfConfiguration  = $ovfConfig
  Name              = $vmName
  VMHost            = 'core-esxi-34.lab.enterpriseadmins.org'
  Location          = '30-Greenfield'
  Datastore         = (Get-Datastore core-tier1-nfs1)
  InventoryLocation = 'Testing'
  DiskStorageFormat = 'thin'
  Confirm           = $false
  Force             = $true
}
$newVM = Import-VApp @newVmSettings
$newVM | Start-VM
You may notice that we did not set the dns or domain properties, as those already had default values. After powering on the VM , we can confirm that the settings were updated and networking is functioning as expected.
Changing the deployment
Once our settings have been set, we can browse to the VM > Configure > vApp Options tab (while the VM is powered off) and adjust our values with the SET VALUE button. When the virtual machine is powered on, the script will automatically run at startup, read the updated OVF properties, and set the values as desired.
Conclusion
I originally started this project because I wanted an extremely small appliance that could be stored in a Content Library and deployed quickly whenever I needed a Linux VM for testing or demos. The result is a TinyCore Linux appliance that occupies only about 28MB on disk while still supporting deployment-time customization through standard OVF properties.
This approach has already proven useful in my lab, and I expect it will become my default “utility VM” going forward. The same techniques could easily be expanded to support additional configuration options or application-specific appliances, making TinyCore Linux a surprisingly capable foundation for custom VMware virtual appliances.