In the May 2023/8.12.1 release notes for Aria Automation, one of the what’s new items was the ability to reserve/unreserve an IP address to make it unavailable/available for deployment. In this release the functionality is supported via API only. This post will cover how to connect to and consume this API
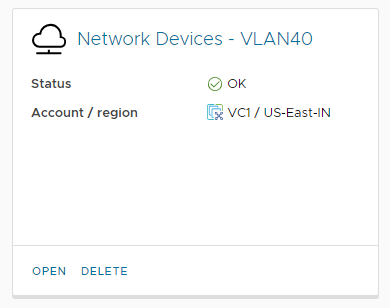
The first thing we’ll look at is the network elements from the web interface to show which object we’ll be interacting with from the API. Under Assembler > Infrastructure > Network Profiles we see various networks. In this case we’ll use VLAN40, which in my lab contains physical network devices.
We will open this tile, then select the Networks tab. From here we can see the 192.168.40.0/24 network.
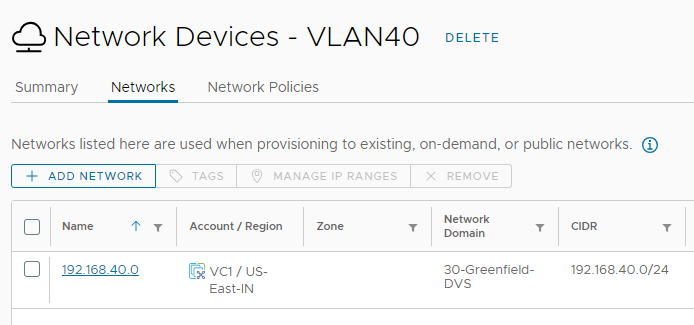
We will select the Network and then click Manage IP Ranges.
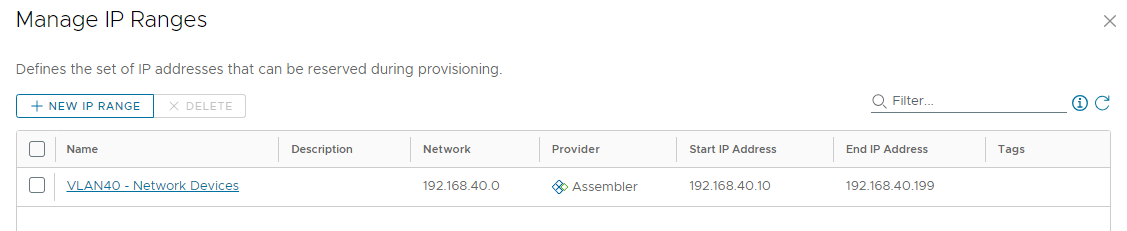
This ‘VLAN40 – Network Devices’ name (which I intentionally set different that the network profile name above) is the one we see when calling the API for a list of network-ranges. I defined the range as being 192.168.40.10 through 192.168.40.199, for a total of 190 usable addresses. Now that we’ve seen the elements in the web interface, we will interact with them using this new API.
Our first task will be logging into the API. We will provide a username/password to obtain a refresh token, then we’ll use that token to obtain a bearer token. This is based on the postman example from this KB article: https://kb.vmware.com/s/article/89129.
$vraHost = 'https://cm-vra-01.lab.enterpriseadmins.org'

$restBody = @{
  username='configadmin'
  password='VMware1!'
  domain='System Domain'
} | Convertto-Json

$refreshToken = Invoke-RestMethod -Uri "$($vraHost)/csp/gateway/am/api/login?access_token" -Method 'POST' -Body $restBody -ContentType 'application/json'
$bearerToken = Invoke-RestMethod -Uri "$($vraHost)/iaas/api/login" -Method 'POST' -Body $(@{refreshToken=$($refreshToken.'refresh_token')}|ConvertTo-Json) -ContentType 'application/json'
Once we have our bearer token, we can use it as a header in our future posts. For example, to obtain a list of network-ip-ranages, we’ll use:
$networkIpRanges = Invoke-RestMethod -Uri "$($vraHost)/iaas/api/network-ip-ranges" -Method 'GET' -ContentType 'application/json' -Headers @{Authorization="Bearer $($bearerToken.token)"}We know from the web interface that the name of our network range is ‘VLAN40 – Network Devices’. We will use a where-object (using the question mark alias) to find the ID of this network.
$thisNetId=($networkIpRanges.content | ?{$_.Name -match 'vlan40'}).id

$networkIpRequest = Invoke-RestMethod -Uri "$($vraHost)/iaas/api/network-ip-ranges/$thisNetId/ip-addresses/allocate" -Method 'POST' -body $(@{description='I need some IPs for the demo app'; numberOfIps=2}|ConvertTo-Json) -ContentType 'application/json' -Headers @{Authorization="Bearer $($bearerToken.token)"}

# wait a few seconds for the request to complete, then ask for results
$reqId = $networkIpRequest.id
foreach ($thisResource in (Invoke-RestMethod -Uri "$($vraHost)/iaas/api/request-tracker/$reqId" -Method 'GET' -ContentType 'application/json' -Headers @{Authorization="Bearer $($bearerToken.token)"}).Resources) {
  Invoke-RestMethod -Uri "$($vraHost)$($thisResource)?apiVersion=2021-07-15" -Method 'GET' -ContentType 'application/json' -Headers @{Authorization="Bearer $($bearerToken.token)"}
}
The networkIpRequest object that results will have an ID property to identify that specific network. In the codeblock below, we will use that ID to get the status of that request. Since we specified that we needed 2 addresses, the Resources property will be a collection of resource IDs. We will loop through the addresses and get more details on each item
$reqId = $networkIpRequest.id
foreach ($thisResource in (Invoke-RestMethod -Uri "$($vraHost)/iaas/api/request-tracker/$reqId" -Method 'GET' -ContentType 'application/json' -Headers @{Authorization="Bearer $($bearerToken.token)"}).Resources) {
  Invoke-RestMethod -Uri "$($vraHost)$($thisResource)?apiVersion=2021-07-15" -Method 'GET' -ContentType 'application/json' -Headers @{Authorization="Bearer $($bearerToken.token)"}
}
The above code will return the details of the two IP addresses that were allocated, results below.
ipAddress             : 192.168.40.10
ipAddressDecimalValue : 3232245770
ipVersion             : IPv4
ipAddressStatus       : ALLOCATED
ipAllocationType      : USER
description           : I need some IPs for the demo app
id                    : 3f025212-e50a-430e-a8f2-baf0e53deb8f
createdAt             : 2023-08-28
updatedAt             : 2023-08-28
orgId                 : e142c6b9-379b-4754-9790-00b4f4373ca4
_links                : @{network-ip-range=; self=}

ipAddress             : 192.168.40.11
ipAddressDecimalValue : 3232245771
ipVersion             : IPv4
ipAddressStatus       : ALLOCATED
ipAllocationType      : USER
description           : I need some IPs for the demo app
id                    : 32416121-39b5-4462-8d51-2bf6743368fa
createdAt             : 2023-08-28
updatedAt             : 2023-08-28
orgId                 : e142c6b9-379b-4754-9790-00b4f4373ca4
_links                : @{network-ip-range=; self=}
As you can see, 192.168.40.10 and 192.168.40.11 are the first two addresses in the pool and those are the ones given to us for our demo app.
Lets assume that we ended up only needing one of those addresses and now want to return / release one to the pool. We can do this with the API as well. The following code needs the Network ID from above, as well as the specific address we want to release. In this example we will return 192.168.40.11.
Invoke-RestMethod -Uri "$($vraHost)/iaas/api/network-ip-ranges/$thisNetId/ip-addresses/release" -Method 'POST' -body $(@{ipAddresses=@('192.168.40.11')}|ConvertTo-Json) -ContentType 'application/json' -Headers @{Authorization="Bearer $($bearerToken.token)"}
This will again return a task ID which looks like this:
progress : 1
status   : INPROGRESS
name     : IP Address Release Task
id       : ad5dc112-3dfc-4f7c-836a-6808084bcd56
selfLink : /iaas/api/request-tracker/ad5dc112-3dfc-4f7c-836a-6808084bcd56
To confirm this completed, we could post to the 'selfLink' to get a status, but instead we will look at our network-ip-ranage and see which addresses are in use. In this case we would only expect 1 address, the 192.168.40.10 IP.
(Invoke-RestMethod -Uri "$($vraHost)/iaas/api/network-ip-ranges/$thisNetId/ip-addresses?apiVersion=2021-07-15" -Method 'GET' -ContentType 'application/json' -Headers @{Authorization="Bearer $($bearerToken.token)"}).content
ipAddress : 192.168.40.10
ipAddressDecimalValue : 3232245770
ipVersion : IPv4
ipAddressStatus : ALLOCATED
ipAllocationType : USER
description : I need some IPs for the demo app
id : 3f025212-e50a-430e-a8f2-baf0e53deb8f
createdAt : 2023-08-28
updatedAt : 2023-08-28
orgId : e142c6b9-379b-4754-9790-00b4f4373ca4
_links : @{network-ip-range=; self=}
ipAddress : 192.168.40.11
ipAddressDecimalValue : 3232245771
ipVersion : IPv4
ipAddressStatus : RELEASED
ipAllocationType : NONE
description :
id : 32416121-39b5-4462-8d51-2bf6743368fa
createdAt : 2023-08-28
updatedAt : 2023-08-28
orgId : e142c6b9-379b-4754-9790-00b4f4373ca4
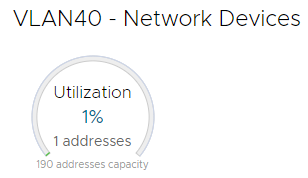
_links : @{network-ip-range=; self=}As we can see above, the 192.168.40.10 address is allocated, while the 192.168.40.11 address has been released. In this case we can see that only 1 address is in use. If we are in the web interface (Assembler > Infrastructure > Network Profiles > specific tile > Networks > Manage IP Ranges) we can see the same — only 1 address is currently used.
I hope this walkthrough shows how to consume this new API to manage Aria Automation (formerly known as vRealize Automation) internal IPAM.