Lab Updates: Ubuntu Server 18.04 LTS Template

Over three years ago I created a post for creating an Ubuntu 16.04 template for use in a lab environment. I’ve been using that template, with very minor updates, ever since. Ubuntu 16.04 LTS (Long Term Support) will stop receiving maintenance updates in just over a year, so I plan to start moving to 18.04 LTS. More information on Ubuntu release cycles can be found here: https://ubuntu.com/about/release-cycle.

To begin, we will download the ubuntu-18.04.3-server-amd64.iso file from http://cdimage.ubuntu.com/releases/18.04/release/ and upload it to a datastore. Next we will create a new virtual machine, entering names and selecting host/datastore/virtual hardware compatibility levels appropriate for our infrastructure.  Select OS Linux>Ubuntu Linux x64.  The default network adapter should be vmxnet3, but I changed the SCSI controller from the default LSI Logic Parallel to PVSCSI.  For the template, I stuck with 1vCPU, 1GB RAM, and 16GB disk (in a future post we will cover growing the filesystem if additional space is needed).  We will select ‘Datastore ISO File’ and browse to the ubuntu-18.04.3-server-amd64.iso file we uploaded earlier, and then confirm that ‘Connect At Power On’ is selected for the CDROM.

With the VM created, we will power it on and open the console, the installer should have begun automatically.  For the install, I mostly selected defaults, except the following:

  • User account to be created: template-admin
  • Partition disks: Guided – use entire disk (without LVM).  When using guided with LVM the volumes embed the template hostname, which will change on deployment.  We can still grow the filesystem without LVM, and other LVMs can be setup in the future, so we will continue without LVM for now.
  • Install security updates automatically.  (Setup Landscape in the future?)
  • Select the box to add openssh server

When complete the installer will disconnect (eject) the CDROM.  This is a good time to edit the VM settings to switch back to ‘Client Device’ so that no CD is attached to the resulting templates once deployed.

Login as the local user created during install.  For example, template-admin.  The IP address for ens192 (the default network adapter) should appear.  We can now SSH in so the following commands can be copied/pasted. First we will set a password for root:

template-admin@ubuntu:~$ sudo passwd root
[sudo] password for template-admin:
Enter new UNIX password: 
Retype new UNIX password: 
passwd: password updated successfully 

Switch to the root user, this will save a bit of time as we can run as this user without specifying sudo for each command. Once we are running as root, we will make sure the system is up to date.

Note: if we use the command ‘su -‘ with a trailing hyphen, the system will put us in the /root folder. If we do not include the trailing hyphen then we will remain in the current directory of the session that issued the su command.

su -
apt update && apt -y upgrade 
apt clean && apt -y autoremove --purge 

Instead of using local accounts, we will join our Ubuntu systems to Active Directory using the BeyondTrust AD Bridge Open Edition. The process is described here: https://repo.pbis.beyondtrust.com/apt.html.  Specifically we will run:

wget -O - http://repo.pbis.beyondtrust.com/apt/RPM-GPG-KEY-pbis|sudo apt-key add -
sudo wget -O /etc/apt/sources.list.d/pbiso.list http://repo.pbis.beyondtrust.com/apt/pbiso.list
sudo apt-get update
sudo apt-get install pbis-open 

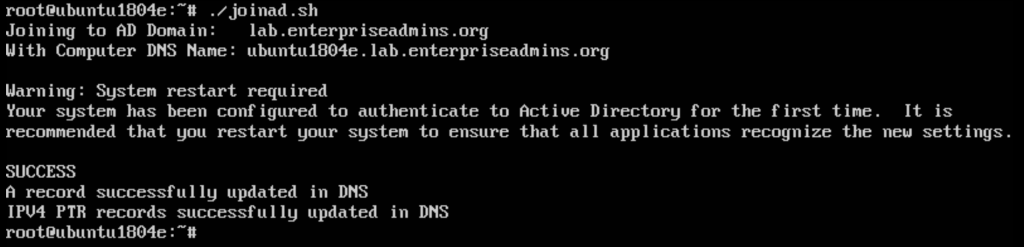
Joining the domain will take a small handful of commands, so we will create a shell script for the template to help with future domain joins.  We will put this script in the root users profile directory, so we can launch it simply after customization with ./joinad.sh.  Launch a text editor such as nano joinad.sh and paste in the following text:

# The following line has the OU, Domain Name, User Account, and Password of a user with permissions to create computer objects.
/opt/pbis/bin/domainjoin-cli join --ou "LAB Servers/Services" lab.enterpriseadmins.org svc-windowsjoin VMware1!
/opt/pbis/bin/config AssumeDefaultDomain true
/opt/pbis/bin/config LoginShellTemplate /bin/bash
/opt/pbis/bin/config HomeDirTemplate %H/%U
/opt/pbis/bin/config RequireMembershipOf "lab\\domain^users"
/opt/pbis/bin/update-dns

Save the file, then make it executable

chmod +x joinad.sh

When executing the above script, a DNS record is created. In the past I’ve had issues with that record eventually being scavenged/deleted by the DNS server. To ensure that the DNS record is occasionally updated, I like to add a task to crontab. We can do this in the template by running crontab -e which will allow us to select a default editor. Once inside the editor we can add a single line like the following:

 1 1 * * 0,3 /opt/pbis/bin/update-dns 

This will schedule a task to run at 1:01 every Sunday and Wednesday. For reference, I did stumble on a great site to validate your crontab syntax at https://crontab.guru/.

The last AD related configuration to make is to add a domain group to the /etc/sudoers file, so that certain users can use sudo to run commands as root. To do this, we edit the /etc/sudoers file and add a line similar to:

 %lab^linux^sudoers   ALL=(ALL) ALL,!ROOTONLY 

This will allow members of the AD group LAB Linux Sudoers to be able to execute commands such as sudo whoami. After entering their password, they should see that they are running a command as root.

By default, netplan uses a client ID for DHCP assignments.  When using DHCP we want to use a MAC address as an identifier.  I found two sources to describe this, first https://bugs.launchpad.net/netplan/+bug/1759532, which links to this parent bug: https://bugs.launchpad.net/netplan/+bug/1738998. The recommendation is to change the netplan yaml config file to include dhcp-identifier: mac. We will do this in a text editor by running nano /etc/netplan/01-netcfg.yaml. The resulting file should look similar to this:

network:
  version: 2
  renderer: networkd
  ethernets:
    ens192:
      dhcp4: yes
      dhcp-identifier: mac

Note: this yaml file uses white space as a deliminator. The dhcp4 and dhcp-identifier lines have 6 leading spaces (there are 2 for ethernets, 2 more for ens192, and 2 more for the property we added).

We could apply this with netplan apply, but doing so will likely result in a new IP address assignment from DHCP and a disconnect from SSH. I really only need the setting for the future, so I’ll leave this for the next reboot.

While working on this template, the VM console was at the login screen, and I accidentally hit the CTRL+ALT+DELETE button in the vSphere HTML5 client… and the VM immediately rebooted.  I tried this a couple of times, and a bit of research confirms it is a default behavior.  I want to disable that in my template, so I used the instructions here: https://www.linuxbuzz.com/disable-reboot-ctrl-alt-del-ubuntu-debian/.  Since we are already switched to the root user, we don’t need to specify sudo for each line and can run these two commands:

systemctl mask ctrl-alt-del.target
systemctl daemon-reload

For time keeping we’ll use timesyncd, so we’ll edit the config file and add our NTP servers. We’ll remove the comment from the NTP line and add our servers, separated by spaces. We can edit the file with any text editor, such as nano /etc/systemd/timesyncd.conf. After changing the file, we’ll want to make these servers active, which we can do with the following restart command:

systemctl restart systemd-timesyncd.service

Install the Log Insight agent.  I have previously downloaded the Log Insight agent installers and placed them on an internal web server.  The web server does not support .deb files, so I simply added a .zip to the end of the file name.  After downloading, we will need to rename the file back to the original name:

cd /tmp
wget http://www.example.com/vmware-log-insight-agent_8.0.0-14743436_all_192.168.45.80.deb.zip
mv vmware-log-insight-agent_8.0.0-14743436_all_192.168.45.80.deb.zip vmware-log-insight-agent_8.0.0-14743436_all_192.168.45.80.deb
dpkg -i vmware-log-insight-agent_8.0.0-14743436_all_192.168.45.80.deb

Check the configuration file to ensure it has the settings you want, for example with nano /var/lib/loginsight-agent/liagent.ini. In my case I decided to enable central_config and auto_update properties.

I used part of a script here: https://jimangel.io/post/create-a-vm-template-ubuntu-18.04/ to make sure new openssh-server keys are generated after template deployment. You should check out the original post for additional optional settings you may want to change at first boot, like a randomly generated hostname. The below text can be run from the shell:

#add check for ssh keys on reboot...regenerate if neccessary
cat << 'EOL' | sudo tee /etc/rc.local
#!/bin/sh -e
#
# rc.local
#
test -f /etc/ssh/ssh_host_dsa_key || dpkg-reconfigure openssh-server
exit 0
EOL

# make sure the script is executable
chmod +x /etc/rc.local

There are a handful of cleanup items we will want to run anytime we crack open the template for updates. Those commands are listed below:

rm -rf /tmp/*
rm -rf /var/tmp/*
rm -f /etc/ssh/ssh_host_*
history -c
shutdown -h now

Add a description to the VM note/annotation field.  This will be cloned when the VM is updated, so it will give you an idea of the starting point for all subsequent VMs.  For example, I added the following text:

2020-01-19: Ubuntu 18.04 Template, Open-VM-Tools 11.0.1,
pbis-open, Log Insight Agent

Convert template-Ubuntu1804 to a template. We now have an Ubuntu 18.04 template that is ready for use.

Posted in Virtualization | 1 Comment

PowerCLI 6.3 R1 unable to connect to vCenter after TLS change

I recently upgraded my lab to vSphere 6.0 Update 3 and then used the vSphereTLSReconfigurator to only allow TLSv1.2 as described in this KB article https://kb.vmware.com/kb/2148819. After completing this change, I noticed that my PowerCLI 6.3 R1 machine could no longer connect to vCenter (although my machine with PowerCLI 6.5 was working fine). The specific error encountered was:

connect-viserver : 3/5/2017 3:47:53 PM  Connect-VIServer                The underlying connection was closed: An unexpected error
occurred on a send.
At line:1 char:1
+ connect-viserver vcsa-01a -user administrator@vsphere.local -p ...
+ ~~~~~~~~~~~~~~~~~~~~~~~~~~~~~~~~~~~~~~~~~~~~~~~~~~~~~~~~~~~~~~~~~~~~~
    + CategoryInfo          : NotSpecified: (:) [Connect-VIServer], ViError
    + FullyQualifiedErrorId : Client20_ConnectivityServiceImpl_Reconnect_WebException,VMware.VimAutomation.ViCore.Cmdl
   ets.Commands.ConnectVIServer

I found this KB article: Enabling the TLSv1.1 and TLSv1.2 protocols for PowerCLI https://kb.vmware.com/kb/2137109 which solved my issue. I created a 32bit DWORD named “SchUseStrongCrypto” in the HKLM\SOFTWARE\Microsoft\.NETFramework\v4.0.30319 key and set the value to 1. Even using the 64bit version of PowerCLI, this DWORD was all that I needed to resolve my issue.

Posted in Virtualization | 3 Comments

Build Your Own Two Factor Authentication Server

I was recently working with Horizon View and VMware Identity Manager in a lab environment. To recreate a specific issue, I needed to enable two-factor authentication. I found a great article describing how to setup RADIUS with Google Authenticator to make this happen (https://blogs.vmware.com/consulting/files/2015/02/VMW_15Q1_TD_Horizon-View-Google-Authenticator_021715_FINAL_EMonjoin.pdf). Unfortunately I ran into a few issues, most likely because I was trying to use a newer version of Ubuntu. I wanted to document the updated steps in case I need to recreate this configuration in the future.

To start, I deployed an Ubuntu 16.04.1 template and joined it to Active Directory. For those steps, you can check out this post: http://enterpriseadmins.org/blog/virtualization/lab-template-ubuntu-16-04/.

VM in hand, and joined to Active Directory, I installed the RADIUS and Google Authenticator modules:

apt-get install libpam-google-authenticator freeradius -y

I then changed the radiusd.conf file to all the user and group to be root for this process. This is needed as Google Authenticator requires the .google_authenticator file created later to only be readable by the user. Running this process as root allows the radius process to read these files as well.

nano /etc/freeradius/radiusd.conf

Find the lines that state user=freerad and group=freerad. Update each to look like:

user=root
group=root

We now update the users authorized to use Free RADIUS. We reject requests from users in a specific group, and then tell FreeRADIUS to use PAM for all other authentications. We do this by removing some comments, and adding a line in the freeradius/users file:

nano /etc/freeradius/users
DEFAULT Group == "lab_radius_disabled", Auth-Type := Reject
Reply-Message = "Your account has been disabled."
DEFAULT Auth-Type := PAM

We now need to update a file to enable pluggable authentication modules in free RADIUS. Note: to find text using nano, you can use CTRL+W.

nano /etc/freeradius/sites-enabled/default

When we find the text for #PAM, remove the pound sign to enable PAM.

The default PAM RADIUS config only expects a password. Since we want to use our Google Auth code, we need to make a few changes.

nano /etc/pam.d/radiusd

Comment out the @include lines in the file, then add the following text:

auth requisite pam_google_authenticator.so forward_pass
account required pam_unix.so use_first_pass

Now we need to define which clients can use our RADIUS server, and what their ‘secret’ will be. It is common to restrict this so only specific hosts can access RADIUS, and each server can have a unique secret. However, for my lab, I’m going to allow all servers to connect to RADIUS using the same secret. We do this by editing this file:

nano /etc/freeradius/clients.conf

And adding a client entry like this one:

client 192.168.0.0/16 {
        secret          = s3cur3.rad
        shortname       = PrimaryLabSubnet
}

Note –  alphanumeric and _-+.  (underscore hyphen plus period) are the supported characters for this secret (from https://support.software.dell.com/kb/154463

Now that we have all of the configuration files edited, we can restart the freeradius service:

service freeradius restart

You are almost there…

Users will need to login (SSH) to our RADIUS server to generate their specific Google Authenticator key. This only needs to happen once (unless they need to regenerate their unique key). By default, a user can just enter ‘google-authenticator’, answer half a dozen questions, and will get a QR code for their unique key.

google-auth-0-capture

To ensure that each user answers these questions the same, lets pre-answer them… by creating an alias for all new users. To save a few characters, we’ll shorten this alias to google-auth.

nano /etc/skel/.bashrc

Now we scroll down to where the other aliases are and add one of our own:

alias google-auth='google-authenticator -tdf -l "$USER Home Lab" -r 3 -R 30 -w 17 -Q ANSI'

This file will automatically be copied to the .bashrc folder for all newly created profiles. If you’ve already logged into your Linux box and want this handy alias, you can edit your personal /home/username/.bashrc file, or just copy the default .bashrc for new users into your profile, like this:

cp /etc/skel/.bashrc /home/bwuchner/.bashrc

Option #1, new users
The first time a user logs in, they will need to create a unique key for their account. To do this, they simply type

google-auth

and lanuch the quick alias we just made. This will generate a QR code they can use to add the account to their mobile device.

google-auth-1-capture

Option #2, existing users
I have several labs, each with their own RADIUS servers. Instead of having a unique key per lab, I re-use my Google Authenticator key across environments — don’t tell my info-security team 🙂

To do this, I just need to copy the contents of /home/bwuchner/.google_authenticator to other RADIUS servers. Since this file only contains simple text, I pass it into a text editor over SSH.

nano .google_authenticator

We add our key text, which looks like this:

A2ANXSELX3KIS5DD
"RATE_LIMIT 3 30
" WINDOW_SIZE 17
" DISALLOW_REUSE
" TOTP_AUTH
52311114
79666855
35676886
84689191
97921843

Note: In the real world you’d like to be much more security conscious of this text, as it represents the ‘something you have’ factor of authentication. Anyone who knows this text can easily impersonate you.

The file must be readable only by the current user, so change permissions with:

chmod 400 ~/.google_authenticator

Thats it! We can now test that everything is working using radtest. Here is simple syntax, assuming my username is bwuchner, password is P@ssw0rd, RADIUS server is 192.168.0.100 and RADIUS secret is s3cur3.rad:

radtest bwuchner 'P@ssw0rd442287' 192.168.0.100 1812 s3cur3.rad

The response should show Access-Accept. If you get something else, like Access-Reject, then check /var/log/auth.log to see what went wrong. I find that it is easiest to have two SSH sessions opened — one running radtest and the other running

tail -f /var/log/auth.log

Good luck, I hope this helps make your lab authentications more secure!

Posted in Virtualization | 9 Comments

Lab template: CentOS 7.2

Recently I’ve been working in a couple of different / disconnected labs. This means I’m managing a couple copies of all my templates manually. Sometimes its hard to find the right section of my notes depending on when/where I’m working on the lab, so I decided to post a couple quick blog posts so I can always find them. The following notes are for creating a template based on CentOS 7.2, and include notes on setting a static IP and joining to the domain with pbis-open (formerly likewise-open).

Special thanks to http://www.tecmint.com/things-to-do-after-minimal-rhel-centos-7-installation/… which showed me how to get ifconfig in my minimal install. I’m not sure who decides what makes the cut for minimal installations, but ifconfig and nslookup seem like they should be in to me.

Install CentOS 7.2 Minimal install from ISO image (http://isoredirect.centos.org/centos/7/isos/x86_64/CentOS-7-x86_64-Minimal-1511.iso), accepting all defaults. Create an administrator account named hostadmin during the install.

Once the install is complete, login as hostadmin. Switch to root and set a password for the root user.

sudo su -
passwd

In my testing, the VM did not get an IP address from DHCP, even though DHCP was available and working. To get online I had to change ONBOOT=no to ONBOOT=yes in the file:

vi /etc/sysconfig/network-scripts/ifcfg-eno16777984

I then restarted networking to bring the interface back up with an IP:

service network restart

Now that I have an IP, I update/upgrade my installation and install some handy/useful packages:

yum update && yum upgrade
yum install net-tools bind-utils nano ntp wget -y

Get the template ready for PowerBroker Identity Services (formerly likewise-open) domain joins:

rpm --import http://repo.pbis.beyondtrust.com/yum/RPM-GPG-KEY-pbis
wget -O /etc/yum.repos.d/pbiso.repo http://repo.pbis.beyondtrust.com/yum/pbiso.repo
yum clean all
yum install pbis-open

At this point, I shutdown the VM and convert it to a template. When I’m ready to use the VM, I deploy a copy from template and follow the remaining steps.

If needed, set a static IP by updating the following file… this is the same file we edited earlier to enable DHCP:

nano /etc/sysconfig/network-scripts/ifcfg-eno16777984

For Static IP, remove bootproto=dhcp, and add the following

IPADDR="192.168.0.101"
PREFIX="24"
GATEWAY="192.168.0.1"
DNS1="192.168.0.20"
SEARCH="lab.enterpriseadmins.org"

Verify that the hostname is properly set:

nano /etc/hostname

Join the Linux VM to the domain and create a DNS record:

domainjoin-cli join lab.enterpriseadmins.org adminbw
/opt/pbis/bin/config AssumeDefaultDomain true
/opt/pbis/bin/config LoginShellTemplate /bin/bash
/opt/pbis/bin/config HomeDirTemplate %H/%U
/opt/pbis/bin/config RequireMembershipOf "lab\\domain^users"
/opt/pbis/bin/update-dns

Once I reach this point, I kick off a quick reboot (just to make sure the domain join took) and am now free to use the VM.

Posted in Virtualization | Leave a comment

Lab template: Ubuntu 16.04

Recently I’ve been working in a couple of different / disconnected labs. This means I’m managing a couple copies of all my templates manually. Sometimes its hard to find the right section of my notes depending on when/where I’m working on the lab, so I decided to post a couple quick blog posts so I can always find them. The following notes are for creating a template based on Ubuntu 16.04.1, and include notes on setting a static IP and joining to the domain with pbis-open (formerly likewise-open).

Install Ubuntu 16.04.1 Server from ISO image (http://www.ubuntu.com/download/server/thank-you?version=16.04.1&architecture=amd64), accepting all defaults. When prompted for an admin user, use the name hostadmin.

Once the install is complete, login as hostadmin. Switch to root and set a password for the root user.

sudo su -
passwd

Apply updates and install the packages openssh-server and ntp:

apt-get update && apt-get upgrade
apt-get install openssh-server ntp -y

Get the template ready for PowerBroker Identity Services (formerly likewise-open) domain joins:

wget http://download1.beyondtrust.com/Technical-Support/Downloads/PowerBroker-Identity-Services-Open-Edition/pbiso/850/pbis-open-8.5.0.153.linux.x86_64.deb.sh
chmod +x pbis-open-8.5.0.153.linux.x86_64.deb.sh
./pbis-open-8.5.0.153.linux.x86_64.deb.sh
cd /opt/pbis/bin/ 

At this point, I shutdown the VM and convert it to a template. When I’m ready to use the VM, I deploy a copy from template and follow the remaining steps.

If needed, set a static IP by updating the following file:

nano /etc/network/interfaces

The important sections to include in the iface settings are address, netmask, gateway, dns-search, and dns-nameservers. An example has been included below:

iface eth0 inet static
address 192.168.0.100
netmask 255.255.255.0
gateway 192.168.0.1
dns-search lab.enterpriseadmins.org
dns-nameservers 192.168.0.20

Verify that the hostname is properly set:

nano /etc/hostname

Join the Linux VM to the domain and create a DNS record:

domainjoin-cli join lab.enterpriseadmins.org adminbw
/opt/pbis/bin/config AssumeDefaultDomain true
/opt/pbis/bin/config LoginShellTemplate /bin/bash
/opt/pbis/bin/config HomeDirTemplate %H/%U
/opt/pbis/bin/config RequireMembershipOf "lab\\domain^users"
/opt/pbis/bin/update-dns

Once I reach this point, I kick off a quick reboot (just to make sure the domain join took) and am now free to use the VM.

Posted in Virtualization | 1 Comment