I recently did some performance comparisons between NFS and iSCSI on a Synology DS723+ NAS. When creating the iSCSI LUNs from within the Synology, there is a ‘Space Allocation’ drop down that has two values: Thick Provisioning (better performance) and Thin Provisioning (flexible storage allocation). When selecting Thin Provisioning, a checkbox appears to enable space reclamation. I’ve done some basic testing at a small scale and observed that both thick & thin devices perform similarly. However, I wanted to dig a bit deeper into the space reclamation functionality.
I suspected this reclamation functionality would map to the VAAI block storage UNMAP primitive, described in detail here: https://core.vmware.com/resource/vmware-vsphere-apis-array-integration-vaai#sec9410-sub6. This core.vmware.com article includes sample commands that you can use from the ESXi host perspective to verify thin provisioning status (esxcli storage core device list -d naa.624a9370d4d78052ea564a7e00011030) and if delete is supported (esxcli storage core device vaai status get -d naa.624a9370d4d78052ea564a7e00011030). Running these commands worked as expected. All thin provisioned LUNs would show Thin Provisioning Status: yes using the first command, and only if the ‘space reclamation’ box was selected would the second command return Delete Status: supported.
As expected, deleting a VM from an iSCSI datastore would be immediately reflected in the usage of the datastore from the ESXi perspective, but not from the NAS perspective. Waiting for automatic VMFS UNMAP would eventually cause the NAS perspective to catch up. To see immediate results, I was able to run esxcli storage vmfs unmap -l nas03-iscsi-lun1 from the ESXi Host. As you can see in the image below, after deleting a VM from the datastore, vSphere was showing 58.2GB used, while the same LUN on the NAS was showing 77GB used.
Running the esxcli storage vmfs unmap -l nas03-iscsi-lun1 command immediately caused the Synology side of the view to update to very similar numbers:
This automatic UNMAP is not new, but was interesting to see in practice. For the last several years I’ve been using NFS datastores in my lab, where deleting a file from the datastore deletes the same file from the NAS filesystem directly, so I haven’t looked closely at the functionality. A more thorough article describing the capabilities and settings can be found here: https://www.codyhosterman.com/2017/08/monitoring-automatic-vmfs-6-unmap-in-esxi/. The article is several years old, but I tested many of the commands using an 8.0u1 ESXi host and had very similar output.
I recently resolved a rather odd issue in my home lab. I don’t fully understand how the symptoms and solution line up, but am writing this article for my future self… if the issue returns I’ll at least have notes on the previous steps. If you end up finding this article from a search, please feel free to leave a comment, I’d be curious to know if you were able to resolve a similar issue.
A couple of months ago, I wanted to clean up some unused connections to a physical switch (tp-link JetStream T1600G-28TS 24-Port Gigabit Smart Switch with 4 SFP Slots). This is an access switch for some gigabit interfaces, has several VLANs configured on it, and does some light static routing of locally attached interfaces. As part of this cleanup, I wanted to reconfigure a few switch ports so that devices with dual connections plugged in next to each other and the unused ports on the switch were contiguous. Not super important but figured it would be an easy cleanup task & free ports would be easier to see in the future. For some reason however, I couldn’t reach the web management interface of the switch. I tried to ping the management interface, but that failed as well. I then tried to ping some of the default gateways for the locally attached interfaces this device was using for routing, but those failed to respond as well. This was odd as the switch was successfully routing & connected devices were communicating fine.
As an initial troubleshooting step, I decided to simply power cycle the switch, assuming that some management functionally was degraded. The switch came back online and devices attached to it were working as expected, however I still wasn’t able to manage/ping the switch. I assumed that the switch may have failed but wanted to troubleshoot a bit more. I thought perhaps one of the devices physically connected to the switch could have been the cause, so one at a time I physically disconnected active adapters, waited a few seconds and when the switch still wasn’t accessible, reconnected the cable. This made me think that the issue wasn’t a specific NIC, but maybe an attached device/host (which may have had a pair/team of network adapters on the switch) was causing the problem. I set out to power down all attached equipment, disconnect all devices, power cycle the switch, and confirm that the switch could be managed/pinged with only one management uplink attached.
While doing the power down process I had a continuous ping of the physical switch management address running in the background. As soon as a specific ESXi host was shutdown, the switch started responding to ping. I made a note of this host (a Dell Precision 7920 named core-esxi-34), but continued powering down everything in the lab, so that I could power it back on one item at a time to see when/if the problem returned. I fully expected turning on core-esxi-34 was going to cause the problem to return… but it did not. I powered on some VMs in the lab & did other testing, but the problem seemed to have cleared up. Thinking this was a one-time issue, solved by a reboot, I went ahead and reconfigured switch ports, moved devices, and completed the physical switch cleanup exercise. Not as easy to complete as I had originally guessed, but complete none the less.
I wanted to keep an eye on the situation, so the next day I tried to ping the switch again, but the symptoms had returned — I was no longer able to ping the physical switch management interface. I decided to start troubleshooting from the ESXi host that was noted during the earlier cleanup. I looked through a few logs and found a lot of entries in /var/log/vmkernel.log. These entries appeared to be SCSI/disk related, and not the network issue at hand, but I made note of them anyway as they were occurring about 10x per second and it was an issue that needed to be investigated.
After seeing them spew by I caught one entry that looked a bit different:
2023-08-22T14:21:07.639Z cpu12:2097198)HPP: HppThrottleLogForDevice:1078: Error status H:0xc D:0x0 P:0x0 . from device t10.NVMe____Samsung_SSD_970_PRO_512GB_______________S469NF0K800877R_____00000001 repeated 10240 times, hppAction = 1
But the 'Failed Dsm Request' entries surrounded this specific line. Since the logs were pointing at a specific storage device, I decided to check and see if any VMs were powered on stored on that device and found just one. I powered down the VM in question, but the log spew didn’t immediately stop. A few minutes later however, the continuous ping of the switch started replying. I checked the vmkernel.log again and noticed the Failed Dsm Request spew had stopped, followed by lines specifically related to that storage device:
2023-08-22T14:35:54.987Z cpu1:2097320)Vol3: 2128: Couldn't read volume header from 63d77d1e-8b63fe7c-04f6-6c2b59f038fc: Timeout
2023-08-22T14:35:54.987Z cpu1:2097320)WARNING: Vol3: 4371: Error closing the volume: . Eviction fails: No connection
2023-08-22T14:36:03.044Z cpu13:2100535 opID=55002bc9)World: 12077: VC opID sps-Main-42624-252-714962-a0-e0-14c9 maps to vmkernel opID 55002bc9
2023-08-22T14:36:03.044Z cpu13:2100535 opID=55002bc9)HBX: 6554: 'local-34_sam512gb-nvme': HB at offset 3211264 - Marking HB:
2023-08-22T14:36:03.044Z cpu13:2100535 opID=55002bc9)  [HB state abcdef02 offset 3211264 gen 28113 stampUS 96099954819 uuid 64e3507b-6256ea04-091a-6c2b59f038fc jrnl <FB 15> drv 24.82 lockImpl 3 ip 192.168.127.34]
2023-08-22T14:36:03.044Z cpu13:2100535 opID=55002bc9)HBX: 6558: HB at 3211264 on vol 'local-34_sam512gb-nvme' replayHostHB: 0 replayHostHBgen: 0 replayHostUUID:  (00000000-00000000-0000-000000000000).
2023-08-22T14:36:03.044Z cpu13:2100535 opID=55002bc9)HBX: 6673: 'local-34_sam512gb-nvme': HB at offset 3211264 - Marked HB:
2023-08-22T14:36:03.044Z cpu13:2100535 opID=55002bc9)  [HB state abcdef04 offset 3211264 gen 28113 stampUS 96129744019 uuid 64e3507b-6256ea04-091a-6c2b59f038fc jrnl <FB 15> drv 24.82 lockImpl 3 ip 192.168.127.34]
2023-08-22T14:36:03.044Z cpu13:2100535 opID=55002bc9)FS3J: 4387: Replaying journal at <type 6 addr 15>, gen 28113
2023-08-22T14:36:03.046Z cpu13:2100535 opID=55002bc9)HBX: 4726: 1 stale HB slot(s) owned by me have been garbage collected on vol 'local-34_sam512gb-nvme'
Unsure how the two issues could be related (a storage error from an ESXi host causing an issue with a physical network switch), I decided to try and move everything off this 512GB NVMe device, delete the VMFS, and not use if for some time and see if the issue returned. The next time I checked the issue had returned. Upon further investigation of the vmkernel.log I found a similar log entry, surrounded by the familiar Failed Dsm Request spew:
2023-08-25T12:00:24.916Z cpu1:2097186)HPP: HppThrottleLogForDevice:1078: Error status H:0xc D:0x0 P:0x0 . from device t10.NVMe____Samsung_SSD_970_PRO_1TB_________________S462NF0M611584W_____00000001 repeated 5120 times, hppAction = 1
This is a different 1TB NVMe device in the host, which had a VMFS volume with running VMs on it. I wanted to see if this NVMe device had any firmware updates available, but I wasn’t able to find firmware for a 970 Pro device, only 970 EVO and 970 EVO Plus. For grins, I did boot the host to a USB device with these firmware updates & it confirmed that the update did not detect devices to update.
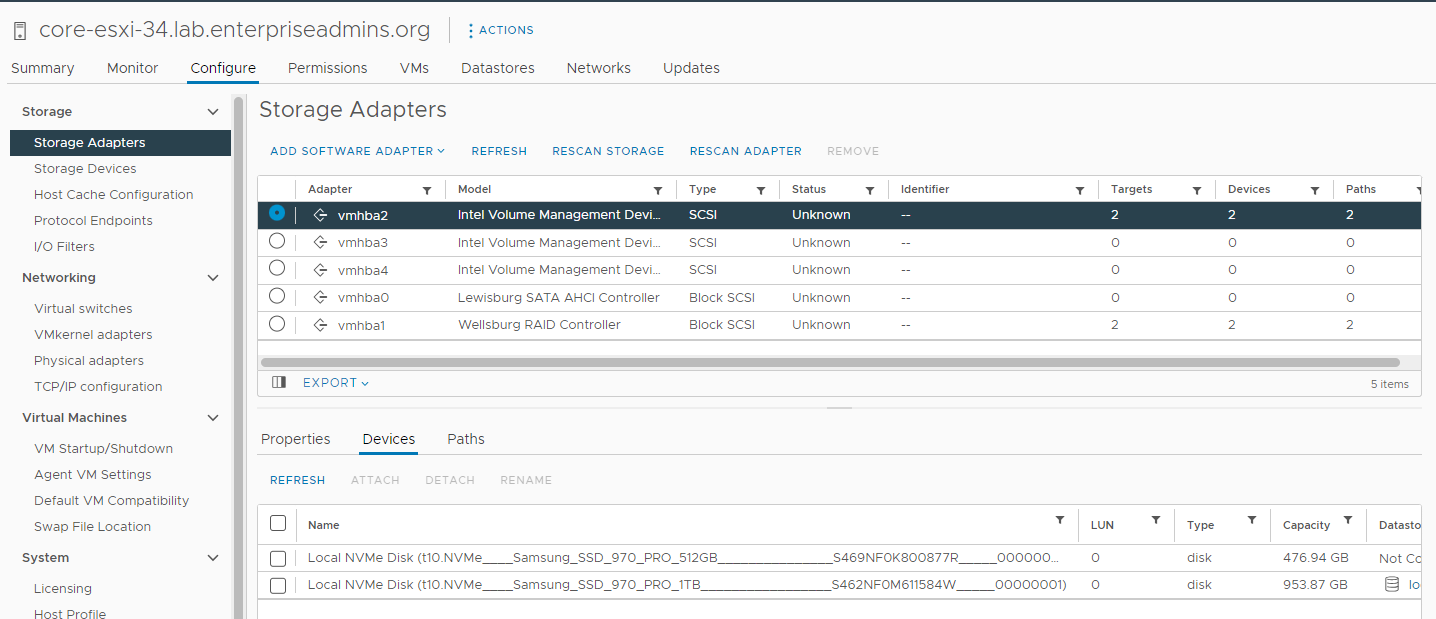
As I was looking at these two NVMe Disks, I did notice one thing that I thought was sort of strange — I had expected each device to have its own vmhba storage adapter, which is somewhat typical for NVMe. However, in my case, both of these devices were attached to vmhba2 per the following screenshot.
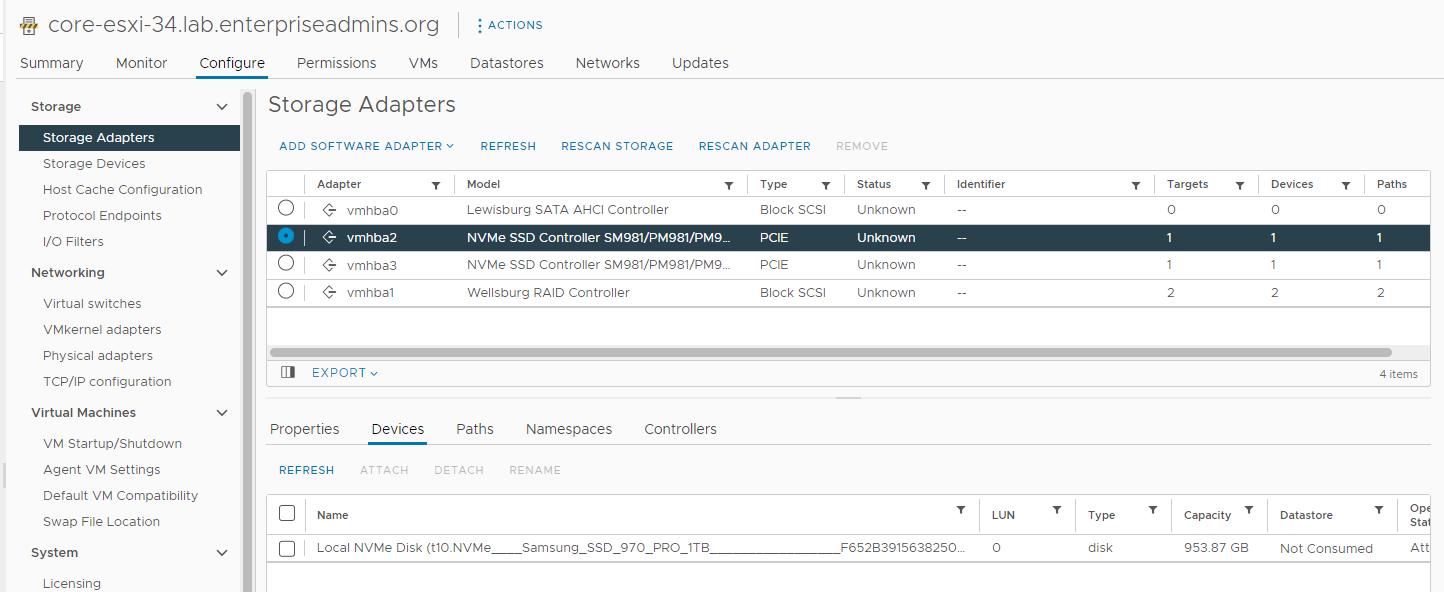
I did a bit of searching on the Intel Volume Management Device and realized that it could provide RAID1 for NVMe. With this particular setup however, these local NVMe devices have short term test VMs on them that I want to perform well, but don’t really care if the data is lost. As an aside, I checked after the fact and confirmed the host had a software package for Intel NVME Driver with VMD Technology (version 2.7.0.1157-2vmw.703.0.20.19193900) installed. I only mention it as it could be relevant and wanted to keep it for my notes as this issue may have been fixable using the VMD controller. I found an article (Precision 5820 Tower, Precision 7820 Tower, Precision 7920 Tower NVMe Drives Do Not Work in Legacy Mode | Dell US) which had some steps for disabling VMD via BIOS > Settings > System Configuration > Intel VMD Technology and deselecting / disabling all the options on that screen. I took this step, but when the host came back online, the local-34_sam1tb-nvme VMFS was inaccessible & it had a couple of VMs on it that I was in the middle of using. I backed out the change and when the host came back online the VMFS was accessible. I migrated the VMs on this datastore to other temporary storage and then reimplemented the changes. After disabling the Intel VMD, the system shows fewer vmhba devices, and each NVMe device is on its own SSD controller. The device type also changed from SCSI to PCIE as pictured below.
I created new VMFS volumes, one on each NVMe device, and moved some VMs back to them to generate IO. I’ve subsequently created new VMs, generated a lot of IO, deleted temporary VMs and generally put the devices through their paces. I have not seen the issue with the management address of the physical switch since. The problem used to return in a few hours/days, but this updated configuration has been running for over a week and has been stable.
Summary: I suspect that disabling Intel Volume Management Device (VMD) for these NVMe devices resolved this issue. However, it is possible there was some sort of VMFS corruption on the devices and deleting/recreating the filesystem was the fix. Additionally, I did not investigate the possibility of a newer/OEM driver for the Intel VMD controller. I wanted to capture these notes in this post; if the issue returns, I’ll I have an idea where to start troubleshooting next time.
First, the Synology DSM version being used during both tests was 7.2-64570 Update 1. I mention this as performance improvements for iSCSI or NFS could occur between DSM releases which could greatly impact the results.
Second, the previous tests focused only on VAAI offload performance. With the exception of the first test, which copied a file from local disk to the Synology DS723+, I didn’t get a feel for if read/write operations within the guests would have any performance differences.
I’m not a huge fan of IO benchmark tools, as they can be tweaked and biased towards a specific configuration. Instead, I came up with three quick tests to look at real world things that I could measure against a specific guest VM. Since some of these tests also require CPU/memory, I performed them one at a time, on a host running no other workloads, and did each test 3 times to find the average runtime. These tests were completed from clones of the same Windows 2022 virtual machine, running on the same ESXi 8.0u1 host.
There are likely more sophisticated tests that could be performed. As outlined in the previous post, this NAS is currently connected with a single 1Gbps NIC and has no SSD. Those are knobs that could be adjusted to impact performance, but for comparisons sake the only variable intentionally adjusted for the tests below is whether the VM resides on NFS or iSCSI backed storage.
Test1: Power on a Windows 2022 virtual machine, which should be primarily a read IO operation. I measured this with Measure-Command { Get-VM TestVM | Start-VM | Wait-Tools} | Select-Object TotalSeconds.
Test2: Update VMware Tools, which should be primarily a write operation (to update/replace existing files). I measured this with Measure-Command { Get-VM TestVM | Update-Tools } | Select-Object TotalSeconds.
Test3: File copy within the guest OS, which should be equal parts read & write. For this I picked an existing folder on the system with lots of small files and copied it to another disk in the system, both backed by the same Synology storage. The source folder was 6.4GB with 66,544 files in 25,572 folders. I measured this with Measure-Command { robocopy C:\Windows\winsxs D:\winsxs /MT:4 /S /DCOPY:DT } | Select-Object TotalSeconds
Test Type
Storage
Time1
Time2
Time3
Average
Power On
NFS
57.79
52.67
52.68
54.38
Power On
iSCSI
58.82
53.75
47.69
53.42
Tools Upgrade
NFS
74.97
97.9
94.42
89.10
Tools Upgrade
iSCSI
89.13
92.95
80.42
87.50
Robocopy
NFS
799
763
757
773
Robocopy
iSCSI
609
679
686
658
Guest Operation performance tests, all values in seconds
Summary: Based on the above table, we can see that the first two tests have very similar results with no noticeable difference between NFS and iSCSI performance. The average time for the two tasks (power on & tools upgrade) are within an acceptable margin of error. For the last test, using robocopy to duplicate a lot of small files, the VM on an iSCSI datastore completed the task about 2 minutes faster (on average) than the VM on an NFS datastore. As with the previous test, this is not what I had expected.
I recently got my hands on a new Synology DS723+ and a couple of 4TB HDD disks for my home lab. My plan is to use this device as a backup target, either as a storage destination for my existing backup product, or perhaps switching to the Synology Active Backup application that can be enabled on the Synology device. I’ll be doing a bit more testing with this in the future, and do plan to write up those results in a future post.
However, since I had this new device, I wanted to revisit a decision I made several years ago — whether I should use iSCSI or NFS for my ESXi Datastores. I wanted to do a side-by-side comparison of the protocols to make sure I was using the optimial one. I also wanted to test NFS with & without the NFS VAAI plugin, to make sure it was worth installing as part of host builds. Several years ago, I purchased a Synology DS1817+ to use as the primary storage in my lab and decided to use NFS with the VAAI plugin. This has worked very well for me, but it never hurts to re-think a decision.
For this test I decided to perform a couple of virtual machine copy and move operations. I wanted to use the same virtual machine, but decided to use one smaller template and one that was a bit larger. Here are some storage details on the two VMs that I used for comparisons:
photon5 – 16GB VMDK, thin provisioned & using about 860MB on disk
win22 – 50GB VMDK, thin provisioned & using about 16GB on disk
Both test VMs were placed on a local NVME disk on a test host which also had a pair of NFS datastores and a pair of iSCSI datastores backed by the Synology DS723+, connected to the network with a single 1GbE port. The DS723+ has two gigabit connections available and can be upgraded to include a 10GbE connection. However, for this test I wanted to focus specifically on storage protocols and having this bottleneck in the network and using HDD instead of SSD seemed acceptable. Changing these factors would improve performance, but my focus of this test was the protocol & VAAI impact instead of pure performance.
To execute the tests & capture results, I decided to use PowerCLI commands inside of a Measure-Command code block and focus on total seconds. I had originally started this test using ESXi 7.0 only, but after seeing another thread mention that the Synology NFS VAAI VIB would work with vSphere 8.0 (although it is not officially supported), I decided to double up all the tests to see if drastic differences existed between the two versions. From the testing below, we can see that the ESXi version had no noticable impact on the testing. I listed the total seconds for the first test only, but did see some variance in multiple runs. I suspect if we averaged the results across 10 runs they would be even closer to the same value.
Test1: Full VM Copy across the network – completed & measured using syntax similar to: Measure-Command {New-VM -VM 'localdisk_photon5' -Name 'nfs_photon5' -VMHost 'testhost' -Datastore 'nfs1'} | Select-Object TotalSeconds
VM
ESXi
Source DS
Dest DS
Time (seconds)
photon5
7.0u3
Local
NFS
12.25
photon5
8.0u1
Local
NFS
13.80
photon5
7.0u3
Local
iSCSI
10.98
photon5
8.0u1
Local
iSCSI
11.96
win22
7.0u3
Local
NFS
169.53
win22
8.0u1
Local
NFS
164.36
win22
7.0u3
Local
iSCSI
178.77
win22
8.0u1
Local
iSCSI
168.55
Results of Test Case 1
Based on the table above, we can see that the performance of all the New-VM operations are roughly the same for the same per source VM size.
Test2: Full VM Copy between datastores of the same type – completed & measured using syntax similar to: Measure-Command { Move-VM -VM 'nfs_photon5' -Datastore 'nfs2' } | Select-Object TotalSeconds
VM
ESXi
Source DS
Dest DS
Time (seconds)
photon5
7.0u3
NFS
NFS
428.32
photon5
8.0u1
NFS
NFS
430.61
photon5
7.0u3
NFS (VAAI)
NFS (VAAI)
22.31
photon5
8.0u1
NFS (VAAI)
NFS (VAAI)
21.97
photon5
7.0u3
iSCSI
iSCSI
2.45
photon5
8.0u1
iSCSI
iSCSI
3.56
win22
7.0u3
NFS
NFS
1384.99
win22
8.0u1
NFS
NFS
1387.60
win22
7.0u3
NFS (VAAI)
NFS (VAAI)
231.77
win22
8.0u1
NFS (VAAI)
NFS (VAAI)
225.20
win22
7.0u3
iSCSI
iSCSI
4.54
win22
8.0u1
iSCSI
iSCSI
4.56
Results of Test Case 2
I did not include specific results, but the tests observed above for Move-VM had similar results to New-VM copies that used the same source/destination datastores. For example, a Windows 2022 New-VM from iSCSI to iSCSI (similar to the last 2 rows of the above table) only took 3.83 seconds. This is most likely due to the fact that both clone and migrate requests are using the XCOPY VAAI primitive, described here: https://core.vmware.com/resource/vmware-vsphere-apis-array-integration-vaai#sec9410-sub4.
Based on the table above, we observe some differences for NFS vs. iSCSI. Installing the NFS VAAI plugin offered a significant improvement vs. the default NFS configuration. However, the VAAI iSCSI performance for Move-VM operations was noticeably better than the best case NFS configuartion.
Summary: These are not the results I had initially expected. I had assumed NFS performance with VAAI enabled would have been much closer to the iSCSI performance numbers. I was very impressed by the iSCSI performance for clones/moves when using VAAI. Based on Test 1, I’m likely to leave the majority of VMs already deployed in their current NFS configuration. I don’t move the VMs around and the VMs aren’t observing any latency, so I can’t think of a compelling reason to go back & move them. However, based on Test 2, I do plan to make some changes. I currently have a couple Aria Automation deployments that use linked clones to improve provisioning times. I’m likely to revisit that configuration, moving the template VMs & target deployments to iSCSI datastores backed by the same Synology array to unlock the super-fast cloning.
Have you ever had a new site come online and want to validate that the items in a subscriber content library are in sync? Or experience some storage issues/corruption and want to make sure your sync’d library is still intact? This post will use a PowerCLI script to quickly validate items in a content library.
$contentLibraryName = 'h114-sub'
$testHost = 'lab-esxi-02.example.org'
$testDatastore = 'local-hdd'

foreach ($clitem in ( Get-ContentLibraryItem -ContentLibrary $contentLibraryName -ItemType ovf | Sort-Object Name ) ) {
  "Starting deploy of item $($clitem.name)..."
  $thisNewVM = $clitem | New-VM -Name "Test_$($clitem.Name)" -VMHost $testHost -Datastore $testDatastore
  if ($thisNewVM) {
    "  New VM created. Will attempt power on."
    [void]($thisNewVM | Get-NetworkAdapter | Set-NetworkAdapter -StartConnected:$false -confirm:$false)
    $thisVMstarted = $thisNewVM | Start-VM | Wait-Tools
    if ($thisVMstarted) {
      "  Startup success, doing cleanup."
      [void]($thisVMstarted | Stop-VM -Confirm:$false)
      [void]($thisVMstarted | Remove-VM -DeletePermanently -Confirm:$false)
    } else {
      "  There was an issue with a test VM for content library item $($clitem.Name).  Cleanup not completed."
    }
  } else {
    write-warning "  Failure occured creating new VM based on $($clitem.Name)!"
  }
}
This script has three variables that must be defined — the name of the subscriber content library, a test host in the site/environment you wish to test, and a datastore from that test host to use for provisioning.
The script will retrieve a list of OVF templates, deploy a new VM from each using the creative name Test + the name of the content library item. Once the item is deployed, the VM will be powered on and wait for tools to start. If Tools start successfully, we can likely assume that the VM is in working order, so the script proceeds to power off/delete the test VM, otherwise it will throw a warning to the screen and continue.
During testing I encountered/created a few issues which I’ll describe below.
The first was caused by an ’empty’ VM which didn’t have an OS installed. It failed with an error that VMware Tools was not installed. The script didn’t delete this VM, but after reviewing an confirming this was expected behavior for the VM, I deleted it anyway.
Wait-Tools : 8/21/2023 6:53:45 AM       Wait-Tools              The specified VM 'Test_emptyVM-notools' does not have VMware Tools
installed.
At line:7 char:46
+     $thisVMstarted = $thisNewVM | Start-VM | Wait-Tools
+                                              ~~~~~~~~~~
    + CategoryInfo          : InvalidOperation: (Test_emptyVM-notools:VirtualMachineImpl) [Wait-Tools], ViError
    + FullyQualifiedErrorId : Client20_VmGuestServiceImpl_WaitTools_ToolsNotInstalledOrVersionIncorrect,VMware.VimAuto
   mation.ViCore.Cmdlets.Commands.WaitTools
To contrive the next error, I ssh’d to the test host, found the content library item on the filesystem, and intentionally corrupted the VMDK by running echo blah > emptyVM-notools-1_248c256e-cab1-4512-b7a0-48322ad4a7bf-flat.vmdk. This resulted in the following error (read below the next error for the resolution to this):
New-VM : 8/21/2023 6:15:29 AM   New-VM          Transfer failed: Error during transfer of
ds:///vmfs/volumes/639245e5-399bba0d-e1e8-000c2927a169//Test_emptyVM-notools/Test_emptyVM-notools.vmdk: The virtual
disk is either corrupted or not a supported format..
At line:3 char:26
+ ... = $clitem | New-VM -Name "Test_$($clitem.Name)" -VMHost $testHost -Da ...
+                 ~~~~~~~~~~~~~~~~~~~~~~~~~~~~~~~~~~~~~~~~~~~~~~~~~~~~~~~~~
    + CategoryInfo          : NotSpecified: (:) [New-VM], ViError
    + FullyQualifiedErrorId : ViCore_VMServiceImpl_DeployFromLibraryItem_ViNetException,VMware.VimAutomation.ViCore.Cm
   dlets.Commands.NewVM
After capturing this error, I deleted the files associated with the content library item. I had assumed that these missing files would trigger the content library to re-sync the content. Instead, I received the following error:
New-VM : 8/21/2023 6:22:32 AM   New-VM          Transfer failed: Error during transfer of ds:///vmfs/volumes/639245e5-399bba0d-e1e8-000c2927a169//contentlib-21c270a1-11
7e-4982-a014-ac122fdb74eb/088a872b-1098-441b-807a-251f76402991/emptyVM-notools-1_248c256e-cab1-4512-b7a0-48322ad4a7bf.vmdk?serverId=bad2b868-9a1e-4d68-ba7e-26
0f397cc0ca: Failed to resolve source datastore file URI(ds:///vmfs/volumes/639245e5-399bba0d-e1e8-000c2927a169//contentlib-21c270a1-117e-4982-a014-ac122fdb74e
b/088a872b-1098-441b-807a-251f76402991/emptyVM-notools-1_248c256e-cab1-4512-b7a0-48322ad4a7bf.vmdk?serverId=bad2b868-9a1e-4d68-ba7e-260f397cc0ca).
At line:3 char:26
+ ... = $clitem | New-VM -Name "Test_$($clitem.Name)" -VMHost $testHost -Da ...
+                 ~~~~~~~~~~~~~~~~~~~~~~~~~~~~~~~~~~~~~~~~~~~~~~~~~~~~~~~~~
    + CategoryInfo          : NotSpecified: (:) [New-VM], ViError
    + FullyQualifiedErrorId : ViCore_VMServiceImpl_DeployFromLibraryItem_ViNetException,VMware.VimAutomation.ViCore.Cmdlets.Commands.NewVM
To address the previous two items, I found the ‘bad’ content library item in the web interface, right clicked and selected delete item content. I had expected this operation to fail, as I assumed that content could only be deleted from the publisher repo and not the subscriber repo. However, this command was successful, removing the ‘size’ property of the item from the content library as if it had never sync’d. Rerunning the script to deploy this content library item caused the item to replicate and the deployment was successful.
Hopefully this script can help you validate content library items if needed. If you have any suggestions on how to improve this script, please leave a comment.