I’ve often found the need to have a very small VM for testing. Some use cases would be testing if a DHCP scope was working, to verify if a VM port group was correctly configured, to confirm if a site-to-site VPN tunnel was up/passing traffic, to deploy/modify with PowerCLI, and many, many more others. Typically all I’m looking for is a command prompt, a network stack, and preferably VMware Tools running. Many years ago I stumbled on TinyCore Linux — a very small distribution that with a GUI and open-vm-tools installed only took 53mb of disk space as an OVA. Such a small distribution was easy and fast to deploy and used nearly no resources, so it was ideal for testing. This OVA was super handy, I had it on various file shares, a web URL, and even as a VM Template so that I could easily get to it for testing. The OVA I created was based on TinyCore 3.6 (Linux kernel 2.6) — like I said, I’ve had this for many years. I recently went looking to see if TinyCore was still being developed and if a newer version was available. What I found was TinyCore 11 (Linux kernel 5.4) that was released earlier this month. The steps below show how you can create your very own lightweight VM based on this latest distribution.
To begin we should download the ISO. I used the CorePlus-11.0.iso from http://tinycorelinux.net/11.x/x86/release/. Once I had the ISO, I uploaded it to a datastore. (Note: These instructions were tested on an ESXi 6.7u3 host, but should be similar on different versions and/or hypervisors.) . Here are the settings I used for the new VM
- Compatible with ESXi 6.0 and later (hardware version 11). Note: as of this writing ESXi 6.0 is still supported, so I made this choice to ensure a the newest features would be available while maintaining maximum backwards compatibility (to all supported platforms).
- Guest OS = Linux \ Other 3.x Linux (32-bit). Note: if using a newer version of virtual hardware, additional / newer Other Linux options may exist. TinyCore is based on Linux kernel 5.4, so we want to pick the nearest option available.
- Memory = 256mb. Note: I tested with lower amounts of RAM, but this was the lowest that worked consistently. Your mileage may vary.
- New Hard Disk – Remove
- New CD/DVD Drive > Datastore ISO File, browse to CorePlus-11.0.iso uploaded earlier and select Connect…
- Expand CD/DVD Drive and change Virtual device Node to IDE1:0
- Add a new device > hard disk, size = 64mb, expand details and change virtual device node to IDE 0:0
- Remove the new SCSI controller as it is not used
- Under VM Options tab \ Boot Options \ confirm that Firmware = BIOS (recommended). Note: if you use a newer version of virtual hardware, a different firmware option may be selected by default.
- Power On VM
- Open with Remote Console (not web console). Note: this requires VMRC to be installed. By default in TinyCore the mouse pointer does not work with the web console.
Once the VM boots, you should see a menu of different boot options. Select the option “Boot Core with X/GUI (TinyCore) + Installation Extension.” Here are additional settings I selected:
- Once the GUI has loaded, run tc-install (the last icon on the bar at the bottom of the screen)
- Select Whole Disk and sda (Frugal and install boot loader should be checked by default)
- Next > ext4 > next > next > Core Only (Text Based Interface) > next > Proceed
- The wizard should say ‘Installation has completed’
- Click Exit on the tool bar at the bottom of the screen, then Reboot
The VM will now boot into the shell prompt of the locally installed copy of TinyCore. We will now install some additional packages from the command line. This assumes the network in use has DHCP available and we already have an IP / internet connectivity.
tce-load -wi pcre.tcz
tce-load -wi open-vm-tools.tcz
tce-load -wi curl.tcz
Note: for me, the open-vm-tools install ended with text about fuse.conf not being a file or directory. This did not cause any issues in my testing.
Next we check to ensure the new packages (pcre.tcz, open-vm-tools.tcz, and curl.tcz) are listed (one per row) in the list of packages loaded at boot (using command cat /etc/sysconfig/tcedir/onboot.lst).
In my testing, I noticed that sometimes open-vm-tools is not started correctly at boot. I’m not sure what causes this, but found a simple workaround by using a script that runs automatically at boot to restart the service. I did this by typing sudo vi /opt/bootlocal.sh
At the end of this file, I pressed i (to get into insert mode) and added the text /usr/local/etc/init.d/open-vm-tools restart. We then save & exit from file by pressing the escape key (to exit insert mode) and typing :wq (to write changes and quit the vi editor).
By default the hostname of the VM is ‘box.’ However, I wanted to set a custom value. To do this we edit the bootsync.sh script by typing sudo vi /opt/bootsync.sh. We then replace the text ‘box’ on the line for sethostname with our FQDN. Note: this isn’t how hostnames are typically set in Linux, and I would assume this would not be updated by a vCenter customization spec. I’m only adding a value for reference when I see the hostname in vCenter that is presented by VMware Tools.
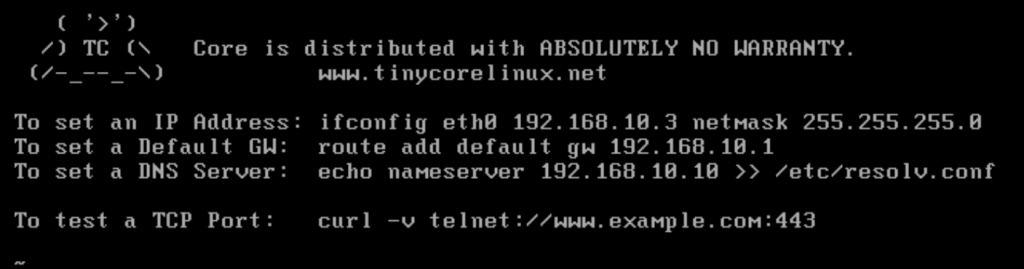
When the VM boots up, there is some text that’s automatically displayed from the message of the day (MOTD) file. We want to edit this to include some simple instructions. However, the changes to the MOTD file are not persistent by default. To include this file in the list of persistent files, we need to add an entry to a file. We can do this by typing vi /opt/.filetool.lst and adding an entry for “etc/motd” (without the quotes). Now that these changes persist, we can make changes to the MOTD with the command sudo vi /etc/motd. In this example I’ve added instructions for how to set a static IP address and to use curl to test a specific TCP port:
As a cleanup step, I like to remove the command history from templates. To do this for TinyCore we can type rm .ash_history to remove the file.
To trigger a backup of the files we’d like to persist, we simply type backup and press y for yes.
With all our changes complete, we can test that the VM starts up correctly by issuing the command sudo reboot.
Confirm that VMware Tools is working and that your message of the day is displayed. On ESXi or vCenter you can confirm that VMware Tools are working by reviewing the status tab of the running VM. In this screenshot you can see that tools version 11269 is running. Clicking more info confirms that this is version 11.0.5 (the latest available as of this post).
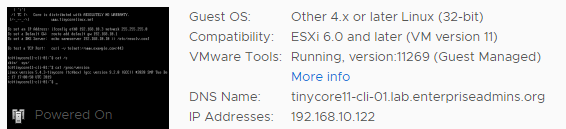
You may notice that the Guest OS is showing Other 4.x or later Linux, even though we selected Other 3.x when creating the VM. This is because VMware Tools is presenting the property from within the guest, instead of defaulting to the property from the VM creation wizard.
You can now shutdown the VM and change the CD ROM back to Client Device (to detach the ISO image). From here we can export the VM to an OVF or convert to a virtual machine template. As an OVF this VM is roughly 19mb on disk. It will deploy very quick and is just enough of an appliance for many test cases.
Note: there are a few other recommended changes you may want to consider if you are building a template for use in VMware Fusion or Workstation that relate to display resizing and copy/paste. Those are documented here: http://wiki.tinycorelinux.net/wiki:vmware_installation.
Pingback: Scripts to max out CPU and Memory | EnterpriseAdmins.org
Pingback: Which Linux Template? | EnterpriseAdmins.org
Hello Brian,
Hope you are well.
Thank you for the article really helpful. I have tried to follow the same and ran into few issues in my home lab and want to check if you have a OVA/OVF which i can upload to my environment?
Thanks,
Pavan
Greetings @Pavan, I didn’t go down the route of posting an OVA because I didn’t want to mess with any of the download metrics or such for the folks over at Tiny Core Linux. What sort of issue are you running into in your lab? Perhaps we could solve it together and document the steps here for the next person who encounters the issue.
Hello Brian,
Thank you very much for coming back to me on this. The issue was once i deployed the VM and started it i could not proceed further as the display was flunky and does not let me do anything. I will try again and come back to you.
Really appreciate your support.
Thanks,
Best Regards
Pavan