Disable SSL for VMware Converter 5 using powershell

Starting with VMware Converter Standalone 5.0, the default action is to secure the P2V data with SSL. While this is nice if you are converting machines across an untrusted network or need the additional level of security, it can really slow down the P2V process. There is a blog post at Jon Kohler’s Blog and a thread on the VMware Communities about this subject.

I’ve been working on a handful of P2Vs, and I always need to find my notes about the NFC SSL setting to remember exactly what I need to change. While I was waiting on one of these P2Vs to complete, I opened up powershell looking for a way to modify the XML file. I now have a simple script on my management server that:

1.) Finds the right file (based off operating system)
2.) Makes a backup copy of the XML
3.) Adds the useSSL element if it does not exist
4.) Modifies the value of config.nfs.useSSL
5.) Restarts the vmware-converter-agent service

If you are interested in the script, you can download it here: VMwareConverterDisableSSL.ps1

I did notice two possible concerns that aren’t important in my environment but wanted to share them just in case. The backup XML file will be overwritten if this script is ran more than one time. This could be fixed by appending a date stamp or random number to the file name (see line 38). Second, the powershell modified version of the XML file does not preserve white space in the comments, so the resulting output is less lines than the source file. The change works as expected and the service does start, so I wasn’t worried about this difference.

Posted in Scripting, Virtualization | Leave a comment

Why does the ‘Update Tools’ button not work from within VMware Tools?

I recently upgraded an ESXi 4.1 Update 1 cluster to ESXi 5.0 Update 1 — but have not upgraded the tools yet. One of the Windows admins I work with mentioned that he noticed a development guest needed a tools upgrade, and since the server needed a reboot anyway, he decided to click the ‘Upgrade Tools’ button from within the guest OS — but nothing appeared to happen. After a few minutes he tried again, and when nothing happened he rebooted the virtual machine manually. When the same issue appeared on another virtual machine a few days later he asked me if something was going on.

After some testing of my own, I was able to recreate and confirm this issue.

If you are using tools from ESXi 4.1 on virtual machine guest running on an ESXi 5.0 Update 1 host, selecting ‘Update Tools’ from within the guest operating system will not work. This is because the running tools version does not understand the setting ‘isolation.tools.guestInitiatedUpgrade.disable’ and does not display an appropriate error message.

Here are the details:

  • Windows guest (confirmed with XP and 2003)
  • VMware Tools 8.3.7-381511 (version number 8295)
  • ESXi 5.0 Update 1 (build 623860)
  • Symptom: Clicking ‘Upgrade Tools’ from within the guest OS does not update VMware Tools. No error message or warning is displayed.
  • Selecting ‘VM > Guest > Install/Upgrade Tools…’ from within vSphere Client works as expected.
  •  
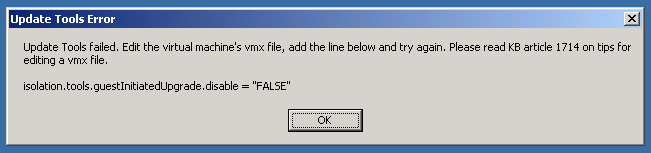
    I tried upgrading the tools to the ESXi 5.0 non-Update 1 version [VMware Tools 8.6.0-515842 (version number 8384)]. The tools were still outdated, but on a more recent version. After those tools were installed, I then attempted to upgrade the tools from within the guest and received the error message: “Update Tools failed. Edit the virtual machine’s vmx file, add the line below and try again. Please read KB article 1714 on tips for editing a vmx file. isolation.tools.guestInitiatedUpgrade.disable=FALSE.” Here is a screenshot of that error message

    Somewhere along the line, the default option was changed to prevent tools upgrades initiated from within guest operating systems. The error handling code for this error must not exist in older tools versions. If you are using tools from ESXi 4.1 on virtual machine guest running on an ESXi 5.0 Update 1 host, selecting ‘Update Tools’ from within the guest operating system will not work. This is because the running tools version does not understand the setting ‘isolation.tools.guestInitiatedUpgrade.disable’ and does not display an appropriate error message.

    Instead of updating the vmx file (as suggested by the error message — and this KB article), I would recommend breaking out some PowerCLI. Here is code that will change the guest initiated upgrade behavior back to the previous 4.x style for a virtual machine named 2k3-test01:
    [cc lang=”powershell”]
    $gIU = New-Object VMware.Vim.optionvalue
    $gIU.Key=”isolation.tools.guestInitiatedUpgrade.disable”
    $gIU.Value=”FALSE”

    #Create a Machine Config Spec using the three option values specified above
    $vmConfigSpec = New-Object VMware.Vim.VirtualMachineConfigSpec
    $vmConfigSpec.extraconfig += $gIU

    #Get a VM View collection of all the VMs that need to have these options
    $vms = get-view -viewtype virtualmachine |where {$_.name -eq “2k3-test01”} # remove ‘where’ statement to update all virtual machines
    $vms | %{ $_.ReconfigVM($vmConfigSpec) }
    [/cc]

    Posted in Scripting, Virtualization | 6 Comments

    Use PowerCLI to mark disk as as SSD

    I’ve recently been working with a few new ESXi hosts. These systems have a pair of solid state disks that I planned to use for host cache. However, ESXi 5.0 did not detect these disks as an SSD type. I found a couple articles describing how to trick ESXi into thinking a data store was SSD:

    Yellow-Bricks: Swap to host cache aka swap to SSD
    VirtuallyGhetto: How to Trick ESXi 5 in seeing an SSD Datastore

    After confirming with my third party vendors that this was a supported configuration, I tested and confirmed that using the enable_ssd option would resolve my issues. Since my host build script is written in PowerCLI, I wanted to re-write the vMA commands using Get-EsxCli.

    [cc lang=”powershell”]
    $localDisk = Get-ScsiLun | where {$_.ExtensionData.DisplayName -match “Local LSI Disk”}
    $canName = $localDisk.CanonicalName
    $esxcli = Get-EsxCli
    $satp = ($esxcli.storage.nmp.device.list() | where {$_.Device -eq $canName }).StorageArrayType
    $esxcli.storage.nmp.satp.rule.add($null,$null,$null,$canname,$null,$null,$null,”enable_ssd”,$null,$null,$satp,$null,$null,$null)
    $esxcli.storage.core.claiming.reclaim($canName)
    [/cc]

    The local VMFS data store needs to be created first. I encountered some errors when running the commands against an unformatted/RAW device.

    Posted in Scripting, Virtualization | 2 Comments

    PowerCLI, say hello to UCS PowerTool

    I’ve recently been digging into Cisco’s Unified Computing System (UCS). I wanted a report showing which ESXi host was in each chassis. I don’t have a lot of blades (yet) so making this list by hand wouldn’t have been a lot of work. However, I had heard about the UCS PowerTool (http://developer.cisco.com/web/unifiedcomputing/pshell-download) and thought this would be a perfect chance to kick the tires. What I had in mind was something that would look like this:

    VMHostName              UCSProfileName     UCSBladeSlot
    ----------              --------------     ------------
    esxbl51.bwuch.local     esxbl5-1           sys/chassis-1/blade-8
    esxbl52.bwuch.local     esxbl5-2           sys/chassis-2/blade-8
    esxbl53.bwuch.local     esxbl5-3           sys/chassis-1/blade-7
    esxbl54.bwuch.local     esxbl5-4           sys/chassis-2/blade-7
    esxbl55.bwuch.local     esxbl5-5           sys/chassis-1/blade-6
    esxbl56.bwuch.local     esxbl5-6           sys/chassis-2/blade-6
    

    Unfortunately the ESXi host name I wanted could not be found in the UCS interface. I was able to find the UUID of the service profile, which maps directly to the UUID in the system.hardware section of Get-View cmdlet for PowerCLI. Since both of the tools are powershell based it isn’t very tough to use them together. (The following code may look long, but that’s because of a lot of comments.)

    [cc lang=”Powershell” width=”565″ height=”1200″]
    # Author: Brian Wuchner
    # Date: 2012/03/03
    # Description: This is a sample inventory report combining information from Cisco UCS Manager with information from VMware vCenter
    # The report uses Windows PowerShell and the following modules available from each vendor:
    # Cisco UCS PowerTool: http://developer.cisco.com/web/unifiedcomputing/pshell-download
    # VMware PowerCLI: http://vmware.com/go/powercli

    # Define UCS connection details
    $ucsSysName = “ucs.bwuch.local”
    $ucsUserName = “admin”
    $ucsPassword = “ucsadminpassword”

    # Define vCenter connection info
    $vcSysName = “vcenter.bwuch.local”

    # Import the UCS PowerTool module and the VMware PowerCLI snapin
    Import-Module “C:\Program Files (x86)\Cisco\Cisco UCS PowerTool\CiscoUcsPS.psd1”
    Add-PSSnapin vmware.VimAutomation.core

    # The UCSM connection requires a PSCredential to login, so we must convert our plain text password to make an object
    $ucsPassword = ConvertTo-SecureString -String $ucsPassword -AsPlainText -Force
    $cred = new-object -typename System.Management.Automation.PSCredential -argumentlist $ucsUserName, $ucsPassword

    # Create connection to UCS system
    $ucsConnection = Connect-Ucs $ucsSysName -Credential $cred

    # Collect the deployed service profiles and convert them to a hash table for easy reference
    $serviceProfiles = Get-UcsServiceProfile | where {$_.AssignState -eq “assigned”} | select name, PnDn, SrcTemplName, Uuid
    $spHT = $serviceProfiles | Group-Object uuid -AsHashTable -AsString

    # Thats all we need from UCS, lets go ahead and logout
    $ucsConnection = Disconnect-Ucs

    # Connect to vCenter
    $vcConnection = Connect-VIServer $vcSysName # if needed the -user and -password parameters can be passed here, otherwise SSPI is used (current windows credentials)

    # Collect vCenter information on Cisco hardware
    $hs = Get-View -ViewType HostSystem -Property Name, Summary.Hardware, Config.Product -Filter @{“Summary.Hardware.Vendor”=”Cisco Systems Inc”}

    # We are done with vCenter, lets go ahead and logout
    $vcConnection = Disconnect-VIServer * -Confirm:$false

    # Put the to lists of information together
    $myReport = @() # collection to store all the results
    $hs | %{ # loop through the host system vCenter information
    # create a variable to store the specific Cisco UCS record by UUID
    $thisCiscoDevice = $spHT[$_.Summary.Hardware.Uuid][0]

    # populate an object using all the applicable fields needed
    $myReport += New-Object -Type PSObject -Property @{
    VMHostName = $_.Name
    VMHostVersion = $_.Config.Product.FullName
    CpuModel = $_.Summary.Hardware.CpuModel
    CpuMhz = $_.Summary.Hardware.CpuMhz
    NumCpuPkgs = $_.Summary.Hardware.NumCpuPkgs
    NumCpuCores = $_.Summary.Hardware.NumCpuCores
    UCSBladeSlot = $thisCiscoDevice.PnDn
    UCSProfileName = $thisCiscoDevice.Name
    UCSProfileTemplate = $thisCiscoDevice.SrcTemplName
    } # end new-object
    } # end foreach-object

    # Select a few of the columns in the order we want to see them…display to screen
    $myReport | Select VMHostName, UCSProfileName, UCSBladeSlot
    [/cc]

    For my report needs, I only needed three columns. I added a handful of additional properties to the $myReport variable for demonstration purposes, but there are many more properties available.

    CpuModel           : Intel(R) Xeon(R) CPU E7- 2850  @ 2.00GHz
    NumCpuCores        : 20
    UCSProfileTemplate : VMware_Blade_5x
    UCSBladeSlot       : sys/chassis-1/blade-8
    CpuMhz             : 1997
    UCSProfileName     : esxbl5-1
    NumCpuPkgs         : 2
    VMHostVersion      : VMware ESXi 5.0.0 build-515841
    VMHostName         : esxbl51.bwuch.local
    
    Posted in Scripting | 1 Comment

    How vCenter assigns MAC addresses

    I’ve recently posted several entries on MAC address conflicts within vCenter:

    Multiple vCenters and MAC address conflicts
    Virtual Machines with Duplicate MAC addresses

    If you look at the first post (and VMware KB 1024025) you’ll notice that vCenter uses a random instance ID to come up with the automatically generated MAC addresses. If you look at the second post, you’ll notice that it is possible for virtual machines to retain their automatic MAC assignment when moving between vCenters — and for the source vCenter to reissue that MAC. This can lead to problems with multiple MAC addresses on the same network.

    What we need to know now is which virtual machines have automatic MAC addresses generated by another vCenter.

    I looked at a couple of vCenter instance IDs and compared them to the automatically generated MAC addresses. Here is what I found:
    vCenter with instance ID 50 will generate a MAC prefix of 00:50:56:b2
    vCenter with instance ID 60 will generate a MAC prefix of 00:50:56:bc

    The important things to note are that:
    1.) only the fourth octet of the MAC changed
    2.) the fourth octet changed by exactly 10 in hexadecimal

    Converting B2 in hexadecimal returned 178 in decimal. BC in hexadecimal is 188 in decimal. Since the fourth octet of the MAC address grows linearly with the instance ID, I took 178 and subtracted the instance ID of 50, which returned 128. To prove this idea, I then changed the instance ID on a test vCenter to 0, rebooted and then added a network adapter to a VM. As expected, the fourth octet of the MAC address was 80 (or 128 in decimal).

    The automatically generated MAC address has a fourth octet of 128 + the vCenter instance ID converted to hexadecimal.

    With this understanding of how the MAC address is generated, I turned back to PowerCLI to help figure out which virtual machines had automatically assigned MAC addresses from other vCenters.

    [cc lang=”powershell”]
    # http://communities.vmware.com/thread/339358
    # Modified to find MAC addresses generated from other vCenter servers
    $myreport = $null
    $global:DefaultVIServers | %{
    Write-Host “Starting vCenter $($_.name)”
    $si = Get-View ServiceInstance -Server $_.name
    $set = Get-View $si.Content.Setting -Server $_.name
    $vCenterInstanceID = ($set.Setting.GetEnumerator() | where {$_.key -eq “instance.id”}).value
    $vCenterMac4 = [Convert]::ToString((128 + $vCenterInstanceID), 16)
    $vCenterMacPrefix = “00:50:56:$vCenterMac4”
    Write-Host “Expected MAC prefix of $vCenterMacPrefix”
    $vCenterName = $_.Name

    $myreport += Get-View -ViewType VirtualMachine -Server $_.name -Property Name, Config.Hardware.Device -Filter @{“Config.Template”=”False”} | %{
    $viewThisVM = $_
    $viewThisVM.Config.Hardware.Device | ?{$_ -is [VMware.Vim.VirtualEthernetCard]} | %{
    New-Object -Type PSObject -Property @{
    VMname = $viewThisVM.Name
    NICtype = $_.GetType().Name
    MacAddress = $_.MacAddress
    AddressType = $_.AddressType
    vCenterName = $vCenterName
    vCenterMacPrefix = $vCenterMacPrefix
    } ## end new-object
    } ## end foreach-object
    }
    }

    $myreport | where {$_.MacAddress -notmatch “^$($_.vCenterMacPrefix)” -AND $_.AddressType -eq “assigned”}
    #The caret in the notmatch comparison signifies the start of string in regex
    [/cc]

    The returned list includes the virtual machines that have automatically assigned MAC addresses that do not match their current vCenter. I know exactly which virtual machines need new/modified MAC addresses to resolve my duplicate MAC issues — without them coming back in the future.

    I have tested the following code to get vCenter to generate a new automatic MAC address for a virtual machine:
    [cc lang=”powershell”]
    $thisAdapter = Get-NetworkAdapter VMNAME
    $thisAdapter.ExtensionData.AddressType = “Generated”
    $thisAdapter.ExtensionData.MacAddress = “”
    Set-NetworkAdapter $thisAdapter -confirm:$false
    [/cc]
    Virtual Machines will need to be powered off/on for the guest operating system to be made aware of this change. Testing shows that Windows virtual machines retain static IP configuration after this change, but Linux guests detect a new network adapter and required re-setting IP information. Your mileage may vary, as always, test before making changes in your production environment.

    Posted in Scripting, Virtualization | Leave a comment