Occasionally there is a need to create a custom ESXi image as either an installable ISO or a depot/zip bundle. For example, when setting up a new host, you may wish to automatically include specific drivers for a particular network card or storage adapter. There are a variety of ways to do this.
PowerCLI Image Builder Cmdlets
PowerCLI has been able to create custom images for many years. In this example, I plan to combine the ESXi 8.0 Update 2 image from VMware with the HPE Server addon (from https://www.hpe.com/us/en/servers/hpe-esxi.html). This specific image combination is already available directly from HPE, but the steps to manually combine the bundles should be the same if the combination is not available, for example if we wanted to include 8.0u2x (where x is a lettered patch release).
The first step is to get our two files, the stock VMware image (VMware-ESXi-8.0U2-22380479-depot.zip) and the HPE addon (HPE-802.0.0.11.5.0.6-Oct2023-Addon-depot.zip). We will add both of these depots to a PowerCLI session using the following:
Add-EsxSoftwareDepot -DepotUrl '.\VMware-ESXi-8.0U2-22380479-depot.zip','.\HPE-802.0.0.11.5.0.6-Oct2023-Addon-depot.zip'
When these depots are added, the Depot Url will appear onscreen, its in the format zip:<localpath>depot.zip?index.xml). We’ll want to note the path listed for the HPE addon as we will use that again shortly. With these depots added we can now query for image profiles. Only the ESXi image will have profiles, but there are likely multiple versions and we want to see what is available.
Get-EsxImageProfile

Name                           Vendor          Last Modified   Acceptance Level
----                           ------          -------------   ----------------
ESXi-8.0U2-22380479-no-tools   VMware, Inc.    9/4/2023 10:... PartnerSupported
ESXi-8.0U2-22380479-standard   VMware, Inc.    9/21/2023 12... PartnerSupported
As mentioned, multiple versions are available, one has VMware Tools (standard) and the other does not (no-tools). We will make a copy of the standard profile
$newProfile = New-EsxImageProfile -CloneProfile 'ESXi-8.0U2-22380479-standard' -Name 'ESXi-8.0U2-22380479_HPE-Oct2023' -Vendor 'HPE'We will now add all of the HPE addons to the copy of our image profile. This is where we’ll need that local depot path mentioned above.
Add-EsxSoftwarePackage -ImageProfile $newProfile -SoftwarePackage (Get-EsxSoftwarePackage -SoftwareDepot zip:D:\tmp\custom-image\HPE-802.0.0.11.5.0.6-Oct2023-Addon-depot.zip?index.xml)In this example we added all of the packages from the depot, but we could have included only a subset of specific VIBs by name if desired. We could have also included other VIBs from different depots (for example, from a compute vendor AND other VIBs from a storage vendor).
With our custom image created, combining the VMware and HPE bits, we can now export as ISO or Bundle (ZIP). In this example I’ll export both. The Bundle (ZIP) will be used for some comparisons later.
Export-EsxImageProfile -ImageProfile $newProfile -ExportToIso -FilePath 'PowerCLI_ESXi-8.0U2-22380479_HPE-Oct2023.iso'
Export-EsxImageProfile -ImageProfile $newProfile -ExportToBundle -FilePath 'PowerCLI_ESXi-8.0U2-22380479_HPE-Oct2023.zip'
vCenter Image Managed Clusters
Starting in vSphere 7, there was an ability to manage hosts with a single image that can create a custom image in the web interface. The screenshot below is from the workflow that comes up when creating a new cluster, we just need to pick the values from the provided drop down lists.
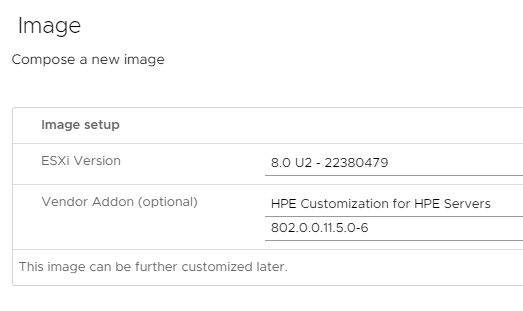
Similar to the above PowerCLI example, we are going to create an image that combines the ESXi 8.0 U2 build with a specific HPE Vendor Add-on (802.0.0.11.5.0-6). Once the cluster creation is complete, the image can be exported from the UI. Select the elipises > Export > and select JSON (for a file showing the selections made), ISO (for an image that can be used for installation), or ZIP (for updating an existing installation). I’m going to download a ZIP to be used in the next step. This results in a file named OFFLINE_BUNDLE_52d9502b-7076-7cb2-49b9-cbee13c57f0a.zip.
Comparing Images
The above two processes attempted to create similar images with identical components (the same ESXi image & HPE addon). We may have a need to compare images like these… either by comparing the depot files or the depot file to a running ESXi host. This section will focus on those comarisons.
Since we have two ZIP archive files, the first inclination might be to simply compare the file size or MD5 checksum. However, if we look at the file size (lenght property below), we’ll notice that the files differ slightly in size. This difference can be explained by a number of things, such as the different strings used for various names.
Get-ChildItem PowerCLI*.zip,offline*.zip | Select-Object Name, Length

Name                                                       Length
----                                                       ------
PowerCLI_ESXi-8.0U2-22380479_HPE-Oct2023.zip            686582727
OFFLINE_BUNDLE_52d9502b-7076-7cb2-49b9-cbee13c57f0a.zip 686552303
What we really need to do is compare the VIB contents of these bundles to see if any files are missing or versions inconsistent. This can be easily completed in PowerCLI. The first step is to import these depots into our session, we can do that as follows:
Add-EsxSoftwareDepot PowerCLI_ESXi-8.0U2-22380479_HPE-Oct2023.zip,OFFLINE_BUNDLE_52d9502b-7076-7cb2-49b9-cbee13c57f0a.zipWith both bundles imported, we can check and see what image profiles we have available. We should see two — one from Lifecycle Manager and the other using the name specified in our PowerCLI example. In this step we’ll create a variable for each profile to be used later
Get-EsxImageProfile

Name                           Vendor          Last Modified   Acceptance Level
----                           ------          -------------   ----------------
VMware Lifecycle Manager Ge... VMware, Inc.    11/20/2023 4... PartnerSupported
ESXi-8.0U2-22380479_HPE-Oct... HPE             11/20/2023 5... PartnerSupported


$ipLCM = Get-EsxImageProfile -Name 'VMware Lifecycle Manager*'
$ipPCLI = Get-EsxImageProfile -Name 'ESXi-8.0U2-2*'
If we dig into the image profiles, we’ll find that each as a VibList property that contains the included VIBs. Digging deeper, we’ll see that each VIB has a Guid that combines the VIB name and version (ex: $ipLCM.VibList.Guid will return the list for one profile; a sample row would look like VMware_bootbank_esx-base_8.0.2-0.0.22380479). Now that we have a field that has details on the various VIBs, we can have PowerShell compare them. The first command below will likely return nothing, the second should return all VIBs from our bundle:
Compare-Object $ipLCM.VibList.Guid $ipPCLI.VibList.Guid

Compare-Object $ipLCM.VibList.Guid $ipPCLI.VibList.Guid -IncludeEqual
With the above, we can confirm that our two bundles (ZIP files) have the same contents.
Another question that I’ve heard is can we confirm that a running ESXi host matches this bundle or if any changes are required? One option to do this is with esxcli software profile update --dry-run (documented here: https://docs.vmware.com/en/VMware-vSphere/8.0/vsphere-esxi-upgrade/GUID-8F2DE2DB-5C14-4DCE-A1EB-1B08ACBC0781.html). However, that typically requires the new bundle to be copied to the host. Since we already have this bundle locally, and imported into a PowerCLI session, we can ask the ESXi host for a list of VIBs and do a comparison locally.
$esxcliVibs = (Get-EsxCli -VMHost 'test-vesx-71' -V2).software.vib.list.invoke()
Compare-Object $ipLCM.VibList.Guid $esxcliVibs.ID
The above example returns a list of VIBs from an ESXi host, then compares the ID value to the Guid from the imported image. If any discrepancies are identified, they’ll be listed. As with the above comparison of the two image files, we can add an -IncludeEqual switch to ensure that the command is actually returning (as it will return all of the VIBs instead of nothing).