I like to have easy access to a variety of lab environments. I keep a fairly active home lab which has a focus on persistent virtual machines — like running copies of various vCenter Server releases, vRealize Suite, Horizon, etc. I like to consider these sort of ‘production’ as when they break I will typically troubleshoot and repair them in place. However, I also like to have very disposable environments that can be destroyed and easily recreated to iterate through some testing. I’ve used an environment before that referred to these as ‘smash labs’ because you could snapshot and smash things as necessary. I’ve been using VMware Workstation and linked clones for a while to provide this sort of ‘smash lab’ environment. I recently had a need to switch PCs and decided to rebuild this environment and document the process. The next few blog posts will focus on various aspects of this project, starting with the end result, and then posts covering the builds for each individual VM.
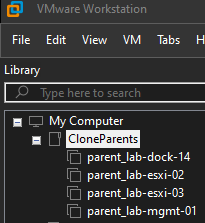
- lab-mgmt-01: The management console/GUI that also acts as a domain controller, DNS Server, Certificate Authority, and NAT gateway.
- lab-esxi-02 and lab-esxi-03: I’ll cover these two VMs in one post because they are very similar. One is a nested ESXi 7.0.3 host and the other is a nested ESXi 8.0.0 host, each containing a corresponding vCenter Server Appliance.
- lab-dock-14: A Photon OS VM with docker and nfs-server services enabled.
We can see all four of these VMs in the following screenshot. You can see that I named them with a parent_ prefix, and that is because I don’t typically power on these VMs, but instead create linked clones that are disposable. This allows me to create various instances of these VMs and switch between them as needed.
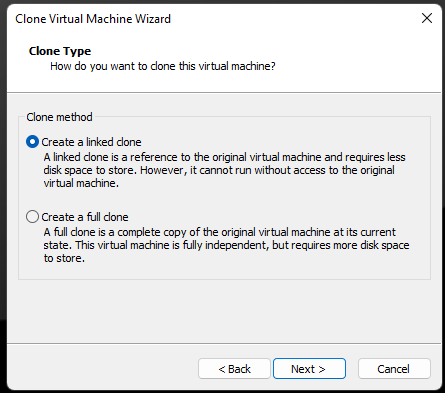
For example, if I need to test something, like an SSL certificate replacement script for vCenter Server 7.0.3, I would create linked clones of parent_lab-mgmt-01 and parent_lab-esxi-02 by right clicking the VM > Manage > Clone. In the wizard that pops up I would select “An existing snapshot (powered off only)” and then selecting “Create a linked clone” on the next page. After giving the VM a name, the clone operation is completed nearly instantly. Relevant screenshots are included below:

These linked clones can be powered on and used as needed. The VMs have static IP addresses, so the way networking is configured I can only power on one linked clone copy at a time, but due to resource limitations on my laptop this hasn’t been a problem.
While we are talking about IP addresses, it is probably helpful to understand the topology that we’ve built. The following image should capture how the VMs interact with each other and the outside network.

As you can see, the lab-mgmt-01 virtual machine is serving as a gateway between the lab network and rest of the network. If we need to test something as if we are in an airgapped network, we can simply disable the NIC1 (Ethernet0) interface on the management server. Without this adapter working, the rest of the lab becomes isolated from the internet and any other services.
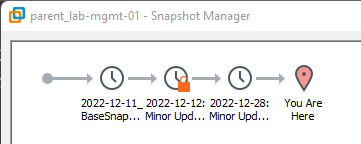
The parent VMs could have a few snapshots. As shown in the following example, one of the snapshots is in use and therefore is locked and cannot be deleted.
Once the test is complete, I could power off my two temporary clones and either delete them or keep them for a couple of days (in case I need to refer back to logs or such).
The next few posts will focus on configuration of the individual component VMs that make up this ‘smash lab’ environment.
Pingback: VMware Workstation lab: Management Console | Enterprise Admins.org
Pingback: VMware Workstation lab: Nested ESXi and vCenter Server | Enterprise Admins.org
Pingback: VMware Workstation lab: Photon OS Container Host and NFS Server | Enterprise Admins.org