I recently read about the new Skyline Health Diagnostics tool. Here is a short quote that captures what this tool is all about.
VMware Skyline Health Diagnostics for vSphere is a self-service tool to detect issues using log bundles and suggest the KB remediate the issue. vSphere administrators can use this tool for troubleshooting issues before contacting the VMware Support. The tool is available to you free of cost.
https://blogs.vmware.com/vsphere/2020/09/introducing-vmware-skyline-health-diagnostic-tool.html
Installation was very straight forward and captured in the official documentation here. I deviated slightly, and opted to use the Photon 3.0 OVA instead of installing Photon from the ISO image. If you go down this route, you may want to grow your root filesystem beyond the 16GB from the initial OVA, if you need help with that check out this blog post.
After setting up the appliance, I decided to replace the SSL certificates for the web site. This is described in the documentation as well, but I made a couple of changes that I’ll outline below.
The first change I made was to the SSL conf file. The official documentation has you edit the entries in the [req_distinguished_name] section so that the entries for commonName and DNS.1 are correct. In addition to doing this, I added a DNS.2 and DNS.3 option to capture the short name of the server as well as a friendly / alias name.
After applying the certificate, I was able to access the interface with the FQDN of the server, but not with the alias information or IP address. After doing a bit of research I found that adding a server_name entry to the nginx configuration would allow me to specify additional names/alias information. I also noticed that there wasn’t an automatic redirect from http to https, which I wanted to add. To do this I edited the nginx configuration with vi /etc/nginx/nginx.conf and added the following information:
server {
        listen 80 default_server;
        server_name _;
        return 301 https://$host$request_uri;
    }
This above section tells nginx to listen on port 80, accept any wildcard server names that come in, then do a http 301 redirect to the https port, using the original host name and URL that were provided.
I then edited the existing sever 8443/ssl section and added the following below the listen 8443 ssl; line: server_name servername.lab.enterpriseadmins.org servername 192.168.10.100 skylinehealth.example.com;
The above line instructs nginx to listen for incoming requests for my FQDN, short servername, IP address, or friendly alias. I could have used the wildcard symbol as shown in the http example, but I wanted to limit SSL requests to only values which were included in the SAN certificate to prevent possible certificate warnings.
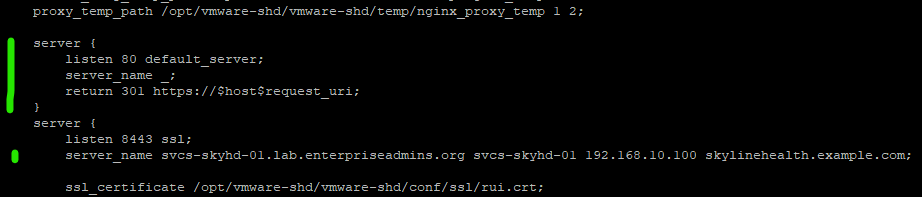
The above screenshot shows the relevant section of the /etc/nginx/nginx.conf file. The green lines to the left denote the entries which were added.
Additionally, I had to update firewall rules to allow incoming HTTP requests. I used sample entries described here: https://www.digitalocean.com/community/tutorials/iptables-essentials-common-firewall-rules-and-commands to make this happen, specifically running the following two commands:
iptables -A INPUT -p tcp --dport 80 -m conntrack --ctstate NEW,ESTABLISHED -j ACCEPT
iptables -A OUTPUT -p tcp --sport 80 -m conntrack --ctstate ESTABLISHED -j ACCEPT
With these minor changes I’m able to access Skyline Health Diagnostics using FQDN, IP Address, and Alias using HTTPS. If I forget and accidentally try to connect over HTTP, nginx will help me out and do the necessary redirect.