I may bit a bit late to the party, but I recently found out about Tailscale. I was looking for a remote access solution for my lab, which is behind my ISPs Carrier Grade NAT (CGNAT). This means I don’t have a publicly accessible IP address, so I really need a solution that can help overcome that configuration. I had heard of Tailscale from a colleague and figured I’d give it a spin. In a minimal amount of time I went from no remote access, to having full remote access to my entire network, and then created a site-to-site tunnel to another colleagues lab. This post will outline the various steps along the way.
Step 1: Remote Access
To get started, I wanted to install the Tailscale client on a system in my lab and on a laptop connected to a different network. In this basic configuration, I assumed I could treat the lab system as a jump box, connect to it with SSH or RDP and be able to reach other devices on my network from there. This was super easy… just install the OS specific application on each system and bam! This was the easy button for setting up remote access, it just worked.
Step 2: Subnet Router
While reading the documentation on Tailscale, I noticed they had a feature called a Subnet Router. This is a service that was designed for devices where the Tailscale client couldn’t be installed, like random network printers, and allowed those devices to be reached from devices on the Tailscale tailnet. I deployed an Ubuntu 20.04 VM to act as my subnet router. The install was straightforward, on the Linux VM I just needed to run a few commands from the console:
curl -fsSL https://tailscale.com/install.sh | sh

echo 'net.ipv4.ip_forward = 1' | sudo tee -a /etc/sysctl.d/99-tailscale.conf
echo 'net.ipv6.conf.all.forwarding = 1' | sudo tee -a /etc/sysctl.d/99-tailscale.conf
sudo sysctl -p /etc/sysctl.d/99-tailscale.conf

sudo tailscale up --advertise-routes=192.168.0.0/17 --accept-routes=true --snat-subnet-routes=false
The Tailscale documentation at https://tailscale.com/kb/1019/subnets was also very helpful in describing these commands/steps.
Step 3: Site-to-Site connectivity
While setting up the subnet router, I noticed the docs had some details on site-to-site networking (https://tailscale.com/kb/1214/site-to-site). This looked very interesting, as I had previously wanted to setup cross site networking to demo VMware Site Recovery Manager. The only caveat I saw in the documentation was:
This scenario will not work on subnets with overlapping CIDR ranges
I pinged a colleague of mine, to see if they would be interested in peering networks, and if so, what IP addresses they used in their lab. Turns out we had some minor overlapping segments, but luckily the segments on my side were internal only/non-routed networks (dedicated to storage & vmotion). I made a few changes to what subnets I advertised on my side, added a statement to adjust MTU, and added a couple route statements within the physical network as described in the Tailscale docs. The updated lines on my subnet router look like this:
iptables -t mangle -A FORWARD -i tailscale0 -o eth0 -p tcp -m tcp --tcp-flags SYN,RST SYN -j TCPMSS --clamp-mss-to-pmtu

sudo tailscale up --advertise-routes=192.168.10.0/24,192.168.32.0/20,192.168.127.0/24 --accept-routes=true --snat-subnet-routes=false
My colleague also deployed a subnet router with a very similar configuration and then also added some routes to his physical network.
curl -fsSL https://tailscale.com/install.sh | sh

echo 'net.ipv4.ip_forward = 1' | sudo tee -a /etc/sysctl.d/99-tailscale.conf
echo 'net.ipv6.conf.all.forwarding = 1' | sudo tee -a /etc/sysctl.d/99-tailscale.conf
sudo sysctl -p /etc/sysctl.d/99-tailscale.conf

iptables -t mangle -A FORWARD -i tailscale0 -o eth0 -p tcp -m tcp --tcp-flags SYN,RST SYN -j TCPMSS --clamp-mss-to-pmtu

tailscale up --advertise-routes=192.168.55.0/24,192.168.60.0/24 --accept-routes=true --snat-subnet-routes=false
With these configurations in place, we could each ping devices on each others network. I’ve created a diagram which includes the routes created in the physical network as a reference.
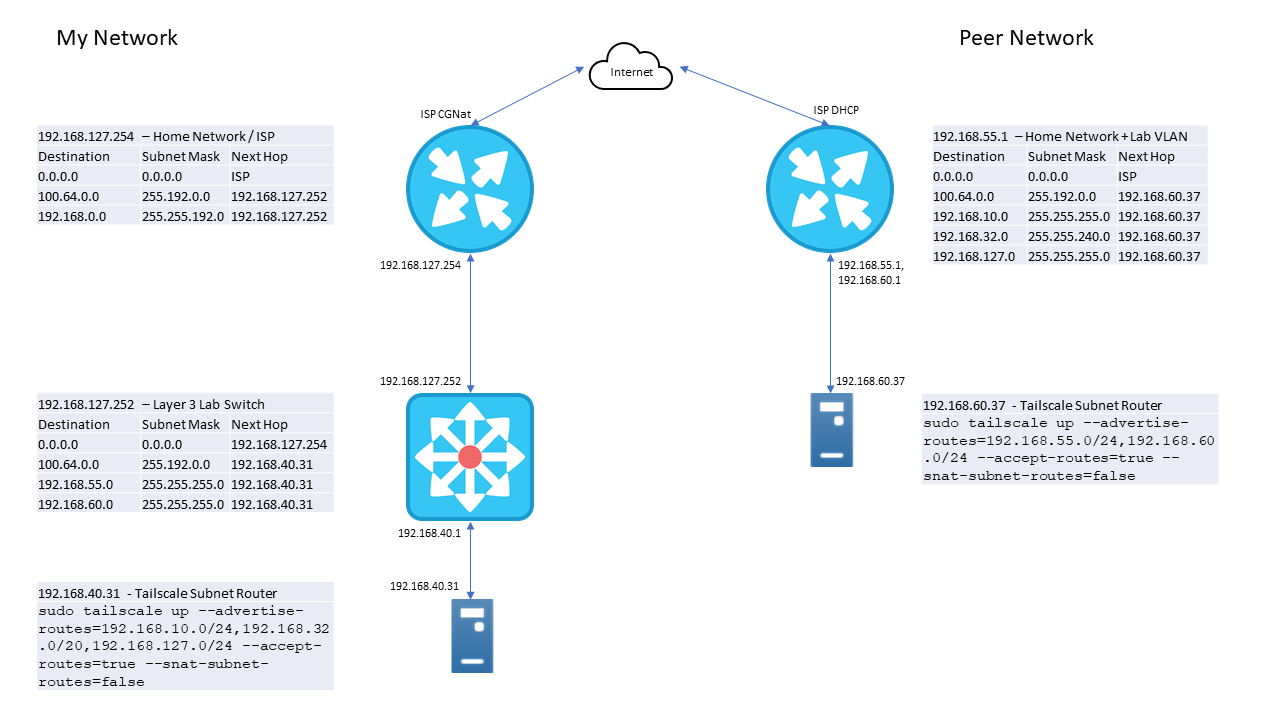
As a test, from a device on my lab, I did a trace route to a device on my collegues network.
> tracert 192.168.60.10

Tracing route to 192.168.60.10 over a maximum of 30 hops

  1     1 ms     1 ms     1 ms  192.168.127.252
  2    <1 ms    <1 ms    <1 ms  192.168.40.31
  3    30 ms    24 ms    26 ms  100.105.105.105
  4    25 ms    24 ms    27 ms  192.168.60.10

Trace complete.
As we can see, traffic goes to my labs layer 3 switch, is sent to the Tailscale Subnet Router, which sends it to a 100.105.x.x address (which is on the tailnet), and then reaches the IP on the remote site. With IP connectivity established, the next steps were to make name resolution work. Since we both have Pihole DNS servers on our networks, this was accomplished by adding conditional forwarding on each of our Pihole servers. With conditional forwarding in place, we are able to query our own DNS servers for the others lab domain names, which in turn will query the correct server. In the Tailscale admin console, DNS is configured for Split DNS with similar configuration, my lab requests come to my DNS servers, their domains going to their DNS servers.
What is great, is that with this third option configured, we not only have site-to-site connectivity, but can reach both networks even while remote, thanks to the Tailscale client installed on mobile device. For example, while connected to a mobile hotspot, not connected directly to either lab, I’m able to trace route to devices on each network.
> tracert 192.168.60.10
Tracing route to 192.168.60.10 over a maximum of 30 hops
  1   486 ms    73 ms    76 ms  agb-vpnrtr01.tail1234.ts.net. [100.105.105.105]
  2   239 ms    80 ms    84 ms  192.168.60.10
Trace complete.


> tracert 192.168.127.30
Tracing route to CORE-CONTROL-21 [192.168.127.30]
over a maximum of 30 hops:
  1    56 ms    11 ms     8 ms  net-vpnrtr-01.tail1234.ts.net. [100.123.123.123]
  2    24 ms    37 ms    55 ms  192.168.40.1
  3    61 ms     9 ms    13 ms  CORE-CONTROL-21 [192.168.127.30]
Trace complete.
Summary
I was surprised how easy it was to setup Tailscale, even in a fairly complex network with overlapping address space. The documentation was easy to follow, the setup was quick, and performance has been very good. I set out to solve one specific problem, and in short order solved that problem — and expanded the lab to an entirely different site along the way.