In a previous post, I described setting up a docker host for some containers that I need to run in a lab. This post will focus on a couple of those containers and how I use them.
One service that I need from time to time is a simple SMTP server. I could be configuring a vSphere Alarm Definition, creating a vROps Alert, or testing out a script that sends an email. I don’t really need a full featured email solution, I just want a destination to send email and an easy place to view those messages to see how they look. The best container I’ve found for this is Inbucket. It is an SMTP target with a web interface to monitor incoming messages. Here is a simple screenshot of an email that was successfully delivered and the short line of PowerShell that sent the message:
To get this container running I only need to type a single command (listed below on multiple lines for readability):
This command runs Inbucket in the background, listens on port 25 (for incoming email), displays the output on a web interface at port 9000, and deletes any messages after a super short 8 hour retention window. This is perfect for my requirements.
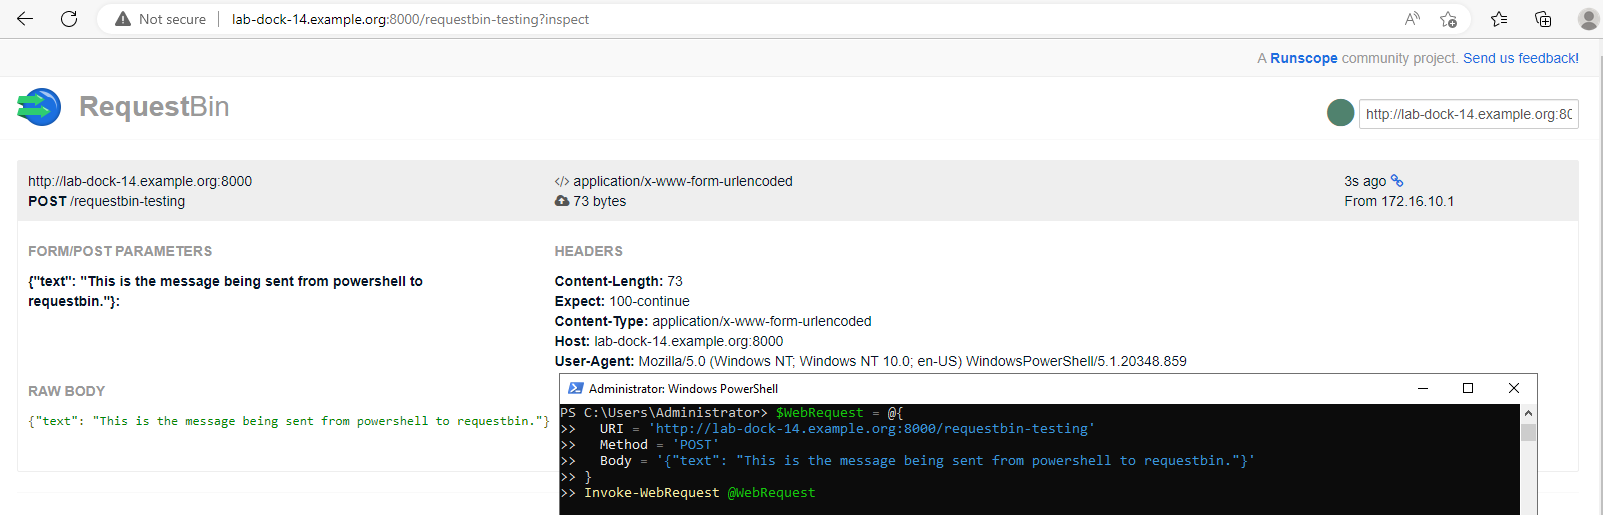
Another service that I found useful is RequestBin. Very similar to the above email example, I have needed to inspect a webhook payload coming from something like vROps or Log Insight. I once incorrectly formatted a JSON message body, it reached my webhook endpoint, and then nothing happened. It took some time before I realized what I had done, but if I would have been able to see the webhook body it would have been much easier. RequestBin has an online service that you could send your payload to, but is also available as a container that can run locally. Again we can start this container with one line:
This creates a webserver listening on port 8000 that we can post to and then view the output. This clearly displays the raw body of the post which can be useful in troubleshooting.
These are the two containers that I find myself using most often in a lab. One other container that I’ve setup recently is nginx-proxy-manager. I didn’t really _need_ this, but wanted to test something using more friendly name/aliases than the above examples that required specific port numbers to be specified. Again, its an easy one line command to get this container running:
Once the web interface is up, you can use it to create nginx type configurations. For example. I can create a DNS record for mail.example.org or requestbin.example.org and then define a proxy host for mail.example.org to forward to lab-dock-14.example.org:9000 and requestbin.example.org to forward to lab-dock-14.example.org:8000. This way I can have multiple services listening on different ports, but then let nginx deal with the port mapping so I only have to enter the friendlier host name. Most of the time this isn’t required for my testing, as I can remember the port numbers or likely only need one HTTP container at a time and can just use the default port.
First of all, thank you to Brian for allowing me to make my first post of what will hopefully be more on EnterpriseAdmins. As a quick introduction, I am a Staff Technical Account Manager at VMware and live near Cleveland, OH.
I recently set out to learn about the VMware Aria Operations Management Pack Builder, which I will abbreviate as MPB for brevity, and in this article, I will bring you along on my learning journey. I found the Communities page to be a good starting point as there were links to the appliance download as well as documentation and other learning tools. And I’ll put it out there now that much of the “figuring out” that occurs through the article was greatly aided by Brian’s help.
The MPB is described in the documentation as a no-code stand-alone appliance that enables the creation of custom management packs for vRealize (Aria) Operations Manager (henceforth referred to as vROps), allowing you to collect data from an external API to to then create or extend resources in vROps with new Data, Relationships, and Events where VMware, or another vendor, has not released an official management pack.
With a basic understanding of what the MPB did, I started looking for an application that was already running in my lab that had both API functionality and interesting content already, and settled on Pi-hole, an ad blocking DNS server. If you don’t already have Pi-hole deployed, you can use Brian’s deployment instructions here. An Internet search showed me that Pi-hole uses “fqdn/admin/api.php” as the base for API calls and brought me to this page which gave enough examples of the Pi-hole API to get started (as a side note, the API structure is not as far along as I would have guessed. We’ll see an example of a shortcoming later in this article).
To explore the Pi-hole API, I started with the “type” request as it does not require authentication. Since my pi-hole server is at 192.168.55.3 and I do not have a TLS certificate enabled, I entered http://192.168.55.3/admin/api.php?type into my browser and got a returned value of {“type”:”FTL”}. This was a good start. I then attempted both the summary and summaryRaw requests, which the document says does not require authorization but found that to not be the case. I set out to determine how to authenticate to the API and found in the Pi-hole admin interface / Settings / API/Web Interface section there is an option to “Show API token”, as shown here
Finding myPi-hole API token
I recorded that token, which I’ll call myAPIToken through the rest of the article, and after a bit of experimenting found that a URL of http://192.168.55.3/admin/api.php?summary&auth=myAPIToken would return the correct dataset. An example of the data from a call to the summary API in my lab is: {“domains_being_blocked”:173812,”dns_queries_today”:93557,”ads_blocked_today”:20121,”ads_percentage_today”:21.506676,”unique_domains”:14998,”queries_forwarded”:52135,”queries_cached”:20425,”clients_ever_seen”:42,”unique_clients”:26,”dns_queries_all_types”:93557,”reply_UNKNOWN”:1018,”reply_NODATA”:19198,”reply_NXDOMAIN”:7366,”reply_CNAME”:29501,”reply_IP”:35897,”reply_DOMAIN”:149,”reply_RRNAME”:1,”reply_SERVFAIL”:10,”reply_REFUSED”:0,”reply_NOTIMP”:0,”reply_OTHER”:0,”reply_DNSSEC”:0,”reply_NONE”:0,”reply_BLOB”:417,”dns_queries_all_replies”:93557,”privacy_level”:0,”status”:”enabled”,”gravity_last_updated”:{“file_exists”:true,”absolute”:1674986048,”relative”:{“days”:1,”hours”:9,”minutes”:37}}}
If you are newer to exploring API’s, like I am, it will be useful to break down the various parts of the URL that we are going to need to understand when creating and testing/troubleshooting our Management Pack Design.
http://192.168.55.3 – the key thing here is that we are using http and not https. This will drive our port and SSL configuration choices
/admin/api.php – Pi-hole uses this path to call an API
? – an indicator that we are passing in a value
summary – the name of the API request that we are using
& – an indicator that there is a second value being passed
auth=myAPIToken – a key/value pair that Pi-hole is expecting for an API request that requires authentication
With sufficient information about the Pi-hole API, I turned to the MPB communities page noted earlier for the download and documentation links to install the appliance into my lab. Following the steps in the documentation, I deployed the MPB in my lab, accessed it via a browser, and set the admin password with no issues to call out.
The documentation does a good job of explaining the main constructs of the Management Pack that we are going to build, defining the terms Design, Object, Requests, and Relationships. For my example of building a Pi-hole MP, I identified that the Pi-hole server was going to be my Object as I have two of those to work with, and that the summary API request was going to provide enough properties and metrics to have meaningful data for this experiment. This proved mostly true except for the hostname of my Pi-hole server, which will be detailed later.
Using the Creating a Design section of the documentation as a guide, I began a new design. The thing that would have been easier had I understood from the start about the Source section of the design is that portions of it are for testing only, but some of it will become content in the actual MP that you build. I will note those sections below:
Edit the name from “Untitled Design” to “PiHole Server”
This will be the name displayed in the Integrations/Repository section of vROps.
In the Reference Environment Settings section:
Hostname – 192.168.55.3
Port – 80
SSL Configuration – No SSL
Base API Path – leave blank
In the Authentication section:
Authentication Source Type – Custom
Add a Field
Label – API token (this will become the prompt for the field where the MP user is prompted to provide their API token when setting up the Adapter)
Value – myAPIToken
Sensitive box – checked This section took me a minute to understand that you are creating a variable, that in my case is called ${authentication.credentials.api_token} that you then use later in place of the auth token. This value will become part of the MP
Nothing in the Global Request Settings section
Advanced Request Settings
Add a Query Parameter (this will become part of the MP)
Key – auth
Value – ${authentication.credentials.api_token}
This is copied from the Authentication section above
Add a Query Parameter (this is only used to validate the Reference environment and will not be carried into the MP)
Key – summary
Value – True (the UI requires us to enter a value, even though the API request doesn’t require this)
Make Request section (this section is only for testing your reference environment)
HTTP Method – Get
Test Request Path – admin/api.php
The URL Preview should look like: http://192.168.55.3:80/admin/api.php?auth=%24%7Bauthentication.credentials.api_token%7D&summary=true This should look very much like the test we performed earlier, except for our token being replaced by the variable %24%7Bauthentication.credentials.api_token%7D When you click the Test button you should see a green box that says, “Successfully connected” and a Check Response link that when you click it displays the results of the summary request. If you don’t get data successfully returned here, compare the URL Preview very carefully to the URL you tested earlier to identify the difference.
With a Source section successfully tested against our reference environment, we move to the Requests section of the design. As the documentation describes, this is where we define the API requests that we need to collect the data that our MP uses. We are going to create two requests, one named “summary” and one named “hostname”. Let’s work through these one at a time.
We determined early on that the summary API request was going to return most of the data that we would use in our MP. And we used it in our Source section to test our reference environment. If you looked at the results of the summary request carefully, you would note that the results do not include the actual hostname of your Pi-hole server. And in fact, there is not an API request that will return the name of your Pi-hole server. If we only have one Pi-hole server this wouldn’t be a horrible problem in vROps, but if we have multiple servers that we want to monitor, there’s not a reliable value to identify which server is which. So, Brian came up with the following clever solution that requires a script to be created on each Pi-hole server but then allows the hostname of the server to be collected:
SSH to your Pi-hole server with a privileged account (in my case “pi”) with the password that you set on that account
Create a new file /var/www/html/get-hostname.php with the following content: <?php echo '{"hostname":"' . gethostname() . '"}'; ?>
If you’re not comfortable with linux commands, you could copy or type the following to create the get-hostname.php file:
sudo nano /var/www/html/get-hostname.php
this creates the file and opens it in the nano editor
paste the line of code from above
Ctrl+X to Exit
Press Y to save the modified buffer
Press Enter to write to the file
With this file created, we can go back to the MPB UI and define the first request that will return data for our MP by clicking the Add Request button then:
Change the name from API Request to hostname
Chain from another API request – no change
Resource Path
get-hostname.php
Advanced – no change
Get data With an HTTP Method of Get, the Preview should look like http://192.168.55.3:80/get-hostname.php and when you click the Request button, should return your Pi-hole server name. We can now click Add Request to create our second request.
Change the name from API Request to summary
Chain from another API request – no change
Resource Path
admin/api.php
Advanced
Body and Headers – no change
Query Parameters
First Parameter
Key – summary
Value – true
Second Parameter
Key – auth
Value – ${authentication.credentials.api_token}
This is the variable that we defined in the Source section
Get data With an HTTP Method of Get, the Preview should match what we saw in the Source section and when you click the Request button, should return a dataset.
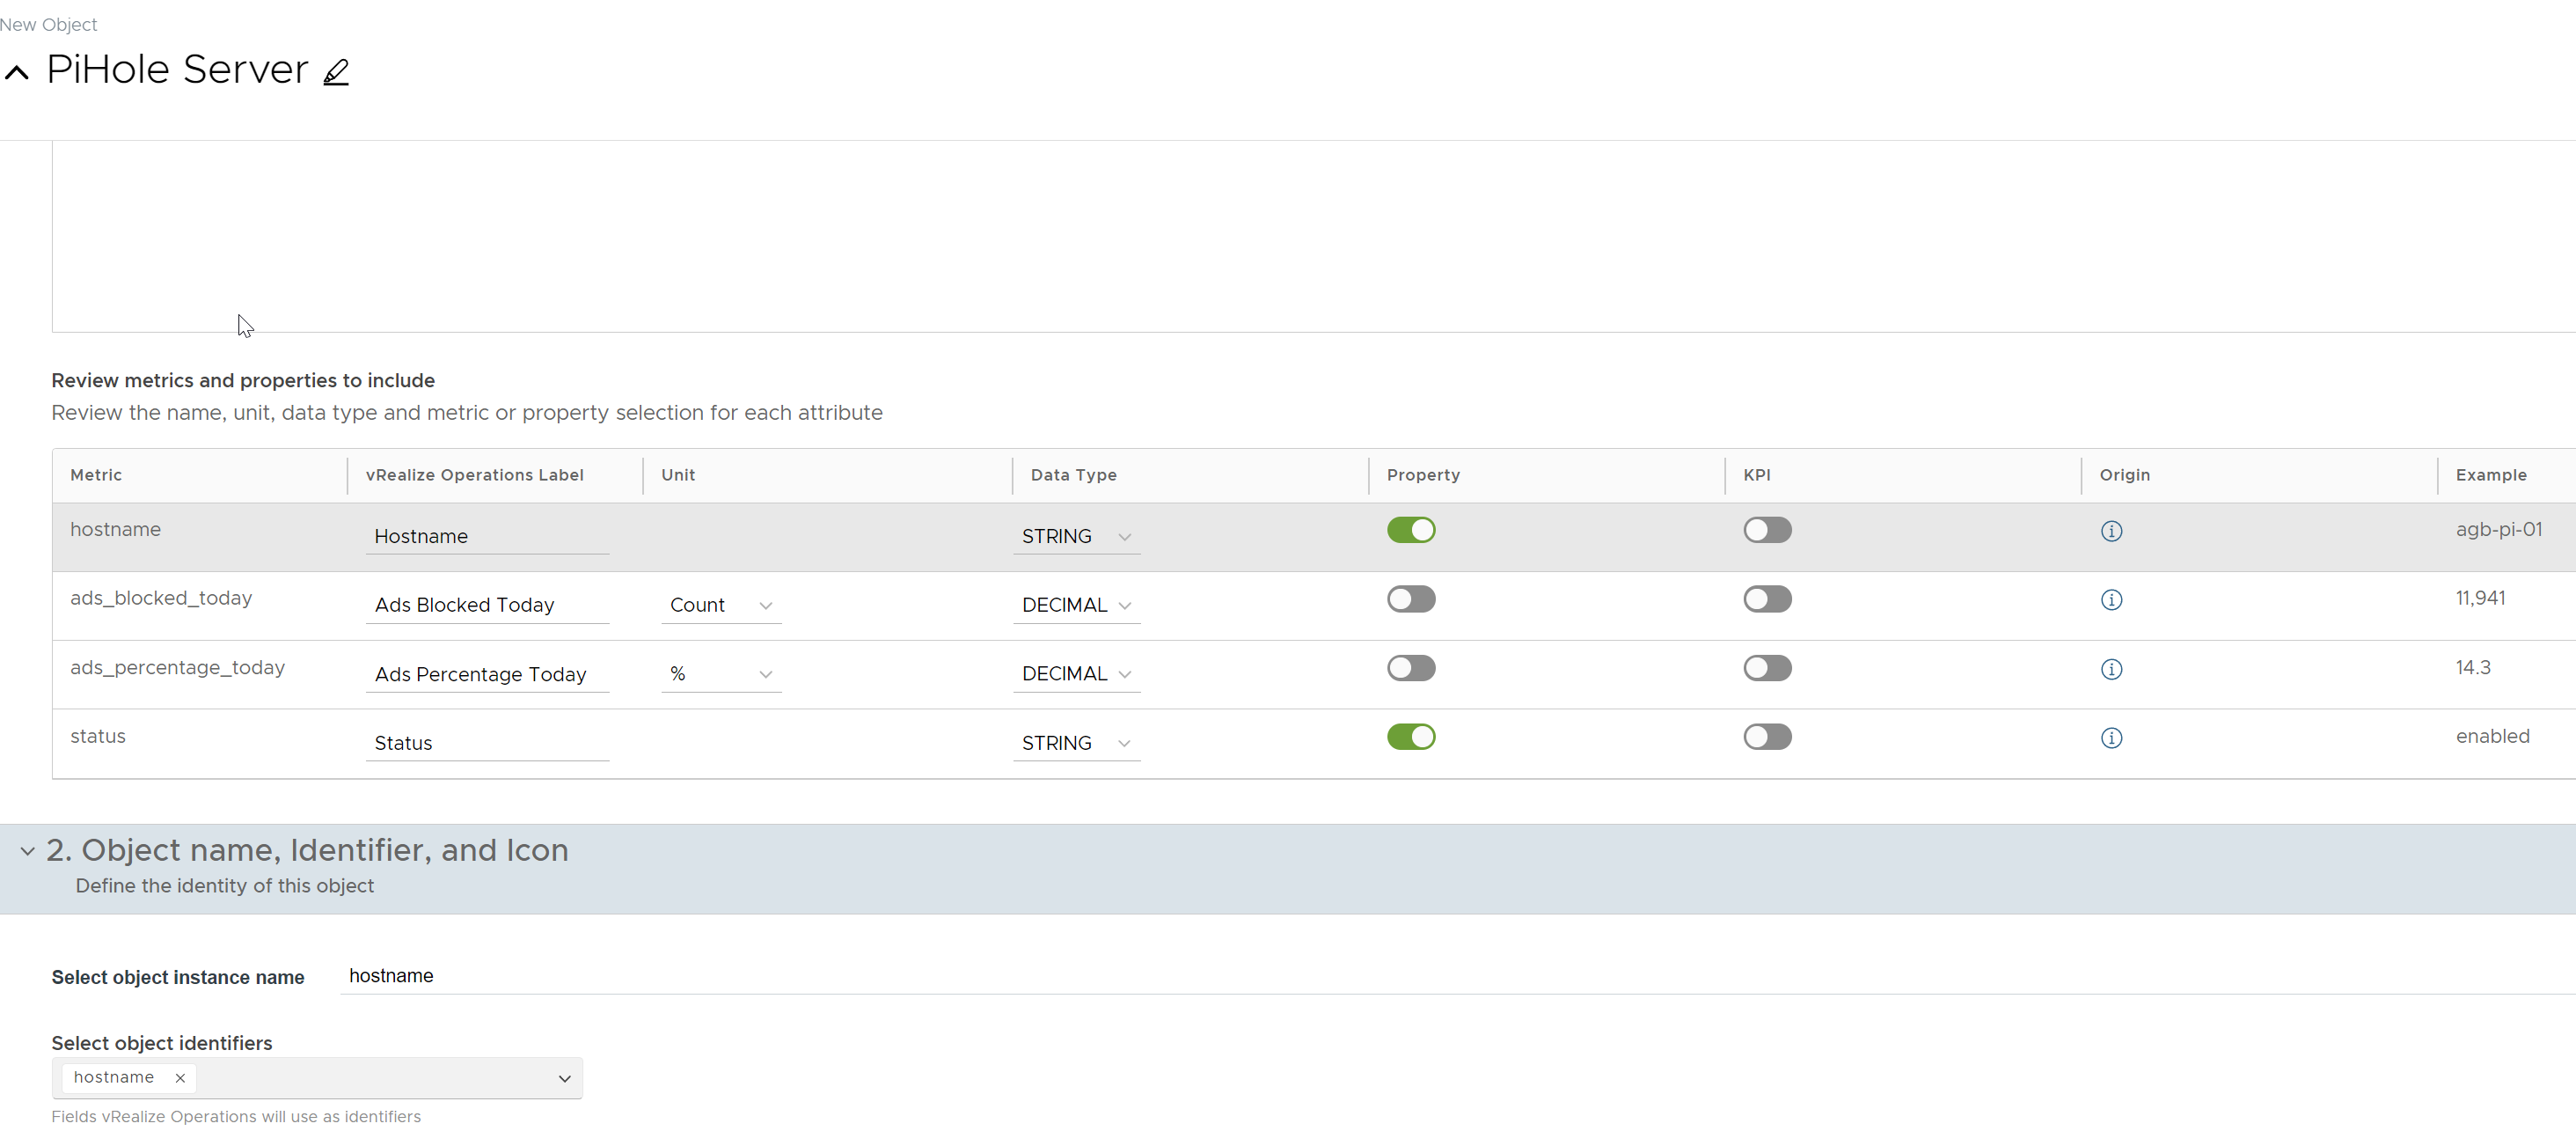
Now that we have defined the Requests, we move to the Objects section of our design where we can select the data from the API requests that we’d like to include in our MP. Click the Add New Object button and populate it as follows:
Change the name to PiHole Server
Metrics and Properties from API Request
Click the << next to summary and select the metrics that you’d like to collect with vROps. Note as you hover over the names, you will see a value that was obtained when you tested the request in the previous section. At a minimum I would suggest:
ads_blocked_today
ads_percentage_today
status
Click the << next to hostname and select ‘hostname’
Scroll down and make the following changes to the chart:
Hostname – leave as is
ads_blocked_today
disable Property
Set Data Type to DECIMAL
Set Unit to Count
ads_percentage_today
disable Property
Set Data Type to DECIMAL
Set Unit to %
Status – leave as is
Object name, Identifier, and Icon
Select object instance name – hostname
Select object identifiers – hostname
The results will look as follows:
Objects section in Management Pack Builder
There are no Relationships to define, and we are not going to create any Events for this example so we can select the Configuration section where we can review and modify MP version as well as labels and default values for various fields. With this information complete, click the Save button near the top of the Design then click the Build button. Review the Identifiers and Properties and since we didn’t define Relationships or Events, click Next. Click the Perform Collection button to collect sample data and review the Collection Summary to ensure the results were as expected then click Next. Lastly, click the Build button to create the MP. Look for the Build succeeded message then click the Go to build link. Click the name/version of the MP which is a link that will start the download of the .pak file. Save this file and you are now ready to import it into vROps.
Installing the resulting .pak file is done like any other MP, from Data Sources / Integrations / Repositories with the exception that you will have to check the box to “Ignore the PAK file signature checking” as this MP is not signed. Once the MP is installed, you add an Account for each of your Pi-hole, which will include adding Credentials to vROps that is the API token for your server. Before long, you too can track your Pi-hole performance in vROps.
Collecting Pi-hole metrics in VMware Aria Operations Manager
I’d love for you to leave a comment below with what other apps you build a management pack for.
Occasionally there is a service that I may temporarily need in my lab, such as an SMTP server or web server, and those are readily available as docker container images. Therefore I decided to have a virtual machine available pre-configured for running docker images. After setting this up, I realized that it would also be convenient to have access to an NFS server that could be used as a shared datastore if needed. There were a couple of container images available for NFS server, but I decided to run NFS directly on this VM instead.
Double-clicking the downloaded OVA starts the VMware Workstation import wizard, and prompts for the virtual machine name. I went with lab-dock-14 since this was going to be running docker and I planned to assign a static IP ending in .14. I adjusted the VM to use ‘VMnet10’ which is the isolated lab network and removed the floppy disk drive. I also decided to add a 50GB disk on SCSI 1:0 to use as a mount for the NFS server. Once the settings were how I wanted, I powered on the VM.
The initial login to the OVA uses root/changeme and forces a password change. I set a password then configured networking by manually typing in the following:
This defines my static IP address, points the default gateway and DNS to the lab side of the domain controller/NAT router. Now I just need to change permissions for the file and restart networking:
From this point, I can use ssh root@172.16.10.14 from my jump server to login to the VM and start using copy/paste to do the rest of my configuration. The first step was to make sure all the packages were up to date with tdnf update.
I then defined my hostname with the command hostnamectl set-hostname lab-dock-14.example.org and made sure this DNS A record was defined in my DNS server.
Docker is preinstalled on the Photon OS appliance, it just needs started & enabled at boot, so I did that with:
systemctl start docker
systemctl enable docker
I wanted to make a /data mount to use as an NFS server and potentially to store container configuration if needed. I confirmed which device I wanted to use by running fdisk -l to list disks and confirmed that /dev/sdb was the unused 50GB disk I added when configuring the VM. I ran mkfs -t ext3 /dev/sdb to put a filesystem on the drive, created a directory with mkdir /data, opened a text editor with vi /etc/fstab and appended /dev/sdb /data ext3 defaults 0 0 to the end of the file. After saving/exiting that file I typed mount /data and confirmed that the new mount was available with df -h.
With the mount defined, I next needed to make it available via NFS. To do this, I first needed to install nfs-utils with tdnf install nfs-utils. I then opened a text editor with vi /etc/exports and added a single line to the file that says:
This says I wanted to make the /data mount available to all hosts over NFS. After saving the file I ran the following commands:
exportfs -ra # this should return nothing, assuming the /etc/exports file is correct
systemctl start nfs-server.service
systemctl enable nfs-server.service
After doing this I attempted to mount the NFS export as a datastore on my nested ESXi host but was unsuccessful. After more troubleshooting than I care to admit, I realized that the firewall was enabled on my Photon OS appliance. For my purposes, I don’t really need the firewall enabled, so I disabled it and set it not to start automatically with:
This solved the problem where I wasn’t able to mount the datastore. Depending on your environment it might be worthwhile to define the ports necessary for NFS, but as I was using NFS3 and that was many ports, this wholesale disabling of the firewall was quicker.
Once this was complete, I rebooted to ensure everything came up as expected (IP & hostname correct, Docker & NFS running, etc) and shutdown with shutdown -h now. Once the VM was powered off, I created a new snapshot so this could be used as a parent virtual machine for future linked clones.
These two nested ESXi hosts only differ in the version of ESXi that is installed. Each has 2 vCPU, 20GB RAM, a 16GB SCSI 0:0 device (for ESXi install) and a 100GB SCSI 1:0 device (for a VMFS datastore). I decided to manually install ESXi, so that I could choose specific builds. I installed 1 patch prior to the latest available, just in case I had a need to attempt an upgrade I wanted to ensure that an upgrade was available. Other than the default next > next > finish installs, I only made 2 changes to these hosts:
Configured networking from the DCUI. This involved setting the IP address to 172.16.10.2 or 172.16.10.3, where the last octet matches the host name, as well as setting the default gateway and DNS server IP to 172.16.10.1, which is the lab side of the domain controller.
Create a VMFS datastore named local-hdd that used the 100GB SCSI 1:0 device. I could have automated this, but since it was a super simple task I decided to just knock it out in the UI.
Once ESXi was installed, I added a deployed corresponding vCenter Server Appliances to the local datastore. For this I first created DNS records for the appliances with associated IP addresses, created a copy of the <cd-rom>\vcsa-cli-installer\templates\install\embedded_vCSA_on_ESXi.json file, specified values for hostname, datastore name, etc and then deployed through the command line with .\vcsa-deploy install C:\tmp\lab-vcsa-13.json --accept-eula --acknowledge-ceip --no-ssl-certificate-verification and waited until the process completed. I ran into two different challenges with this. First, running a nested 64-bit guest requires that “Virtualize Intel T-x/EPT or AMD-V/RVI” be selected on the processor configuration. Credential Guard was enabled on my system and had to be disabled to allow for the VCSA to start. The other challenge that I encountered was that by default ntp_servers is defined as time.nist.gov in the JSON configuration file. I didn’t change this, but deployed the VCSA when my laptop could not reach the internet. The VCSA startup failed and reviewing log files showed all time stamps with a 1970-01-01 timestamp. I remembered that NTP was set to an internet address, so I tried to deploy again after updating the JSON file to point to time.example.org, which was a CNAME configured to the DNS server lab-mgmt-01.example.org, and this worked without error.
Once the VCSA was running, I debated on whether or not I should create inventory (like a new Data Center object, containing a Cluster with my nested ESXi host, etc) but decided to leave the VCSA completely unconfigured. This will allow me to address the configuration each time the environment is deployed. In the past I’ve created a minimal config, so time will tell which route is best. If having a minimal configuration is more practical, I can address that issue and create a new snapshot if needed.
With my ESXi host & VCSA deployed, I powered down the VCSA and ESXi host. Once the Workstation ESXi VM was powered off, I created a new snapshot so this could be used as a parent virtual machine for future linked clones.
This VM is a Windows Server 2022 Standard virtual machine with a very generic install. A lot of services will end up running on this VM and its likely that it will be used by nearly every test. Therefore, I decided to try and document the configuration in PowerShell, in case I ever wanted to update it to a newer version of Windows via re-deploy.
This first section of code will rename the computer
# Set IP address for interface #2; see previous post for network diagram.
New-NetIPAddress -InterfaceAlias 'Ethernet1' -IPAddress 172.16.10.1 -PrefixLength 24 -Confirm:$false

# Set the computer name
Rename-Computer -NewName 'lab-mgmt-01' -Restart:$true

### We need a reboot after a name change before a dcpromo, this should happen automatically as part of above Rename-Computer setp ###
The second set of code will focus on installing the active directory components and promoting this system to a domain controller for a new forest named example.org. I like using example domain names as these are specifically reserved by RFC 2606 – Reserved Top Level DNS Names (ietf.org) and make documentation/screenshots look nice.
# Install AD and DNS roles
Install-WindowsFeature -name AD-Domain-Services,DNS -IncludeManagementTools

# Make me a new AD Forest
Import-Module ADDSDeployment
Install-ADDSForest `
-CreateDnsDelegation:$false `
-DatabasePath "C:\Windows\NTDS" `
-DomainMode "WinThreshold" `
-DomainName "example.org" `
-DomainNetbiosName "EXAMPLE" `
-ForestMode "WinThreshold" `
-InstallDns:$true `
-LogPath "C:\Windows\NTDS" `
-NoRebootOnCompletion:$false `
-SysvolPath "C:\Windows\SYSVOL" `
-Force:$true
After the system is promoted to a domain controller it will automatically reboot. When the system comes back up there are a few more services we need to install like the Certificate Authority and Routing components.
### PART 2, AFTER AD REBOOT ###
Install-WindowsFeature Routing,Adcs-Cert-Authority,Adcs-Web-Enrollment -IncludeManagementTools


# Configure RRAS
Install-RemoteAccess -VpnType RoutingOnly
$ExternalInterface="Ethernet0"
$InternalInterface="Ethernet1"

cmd.exe /c "netsh routing ip nat install"
cmd.exe /c "netsh routing ip nat add interface $ExternalInterface"
cmd.exe /c "netsh routing ip nat set interface $ExternalInterface mode=full"
cmd.exe /c "netsh routing ip nat add interface $InternalInterface"

# Configure Certificate Authority
Install-AdcsCertificationAuthority -CAType EnterpriseRootCA -CACommonName rootca.example.org -ValidityPeriod:Years -ValidityPeriodUnits 10 -Confirm:$false
Install-AdcsWebEnrollment -Confirm:$false
There were a few more steps that I completed manually.
In the Certification Authority console > right click the CA rootca.example.org > Security tab > select the Administrators group > check the box for Request Certificates. This will allow the default admin user to be able to request certificates.
Create a DNS record for time.example.org to be a CNAME back to the domain controller. This allows the domain controller to provide time to the ESXi hosts & VCSA and allows things to work as expected even when disconnected from the internet. Note: any DNS edits will need to happen in this parent VM to be available for other lab exercises. In addition to this time record that was initially created, it might be helpful to create extra records that might point at the container host, for services like SMTP.
Configured DNS to disable root hints and set forwarder to home network DNS Server (could have pointed to Google or CloudFlare).
Installed PowerCLI module and configured some common settings: Install-Module vmware.powercli; Set-PowerCLIConfiguration -InvalidCertificateAction:Prompt -ParticipateInCeip:$true -Scope:AllUsers
Ran VMware Horizon OS Optimization Tool to disable services like screensaver and Windows Update.
Configured autologin in Workstation under VM > Settings > Options > Autologin so that we automatically login as the domains Administrator account.
I rebooted the VM a couple of times to make sure that Autologin worked, services would startup and everything was working as expected. I finally powered down the VM and created a new snapshot so this could be used as a parent virtual machine for future linked clones.