First of all, thank you to Brian for allowing me to make my first post of what will hopefully be more on EnterpriseAdmins. As a quick introduction, I am a Staff Technical Account Manager at VMware and live near Cleveland, OH.
I recently set out to learn about the VMware Aria Operations Management Pack Builder, which I will abbreviate as MPB for brevity, and in this article, I will bring you along on my learning journey. I found the Communities page to be a good starting point as there were links to the appliance download as well as documentation and other learning tools. And I’ll put it out there now that much of the “figuring out” that occurs through the article was greatly aided by Brian’s help.
The MPB is described in the documentation as a no-code stand-alone appliance that enables the creation of custom management packs for vRealize (Aria) Operations Manager (henceforth referred to as vROps), allowing you to collect data from an external API to to then create or extend resources in vROps with new Data, Relationships, and Events where VMware, or another vendor, has not released an official management pack.
With a basic understanding of what the MPB did, I started looking for an application that was already running in my lab that had both API functionality and interesting content already, and settled on Pi-hole, an ad blocking DNS server. If you don’t already have Pi-hole deployed, you can use Brian’s deployment instructions here. An Internet search showed me that Pi-hole uses “fqdn/admin/api.php” as the base for API calls and brought me to this page which gave enough examples of the Pi-hole API to get started (as a side note, the API structure is not as far along as I would have guessed. We’ll see an example of a shortcoming later in this article).
To explore the Pi-hole API, I started with the “type” request as it does not require authentication. Since my pi-hole server is at 192.168.55.3 and I do not have a TLS certificate enabled, I entered http://192.168.55.3/admin/api.php?type into my browser and got a returned value of {“type”:”FTL”}. This was a good start. I then attempted both the summary and summaryRaw requests, which the document says does not require authorization but found that to not be the case. I set out to determine how to authenticate to the API and found in the Pi-hole admin interface / Settings / API/Web Interface section there is an option to “Show API token”, as shown here

I recorded that token, which I’ll call myAPIToken through the rest of the article, and after a bit of experimenting found that a URL of http://192.168.55.3/admin/api.php?summary&auth=myAPIToken would return the correct dataset. An example of the data from a call to the summary API in my lab is:
{“domains_being_blocked”:173812,”dns_queries_today”:93557,”ads_blocked_today”:20121,”ads_percentage_today”:21.506676,”unique_domains”:14998,”queries_forwarded”:52135,”queries_cached”:20425,”clients_ever_seen”:42,”unique_clients”:26,”dns_queries_all_types”:93557,”reply_UNKNOWN”:1018,”reply_NODATA”:19198,”reply_NXDOMAIN”:7366,”reply_CNAME”:29501,”reply_IP”:35897,”reply_DOMAIN”:149,”reply_RRNAME”:1,”reply_SERVFAIL”:10,”reply_REFUSED”:0,”reply_NOTIMP”:0,”reply_OTHER”:0,”reply_DNSSEC”:0,”reply_NONE”:0,”reply_BLOB”:417,”dns_queries_all_replies”:93557,”privacy_level”:0,”status”:”enabled”,”gravity_last_updated”:{“file_exists”:true,”absolute”:1674986048,”relative”:{“days”:1,”hours”:9,”minutes”:37}}}
If you are newer to exploring API’s, like I am, it will be useful to break down the various parts of the URL that we are going to need to understand when creating and testing/troubleshooting our Management Pack Design.
- http://192.168.55.3 – the key thing here is that we are using http and not https. This will drive our port and SSL configuration choices
- /admin/api.php – Pi-hole uses this path to call an API
- ? – an indicator that we are passing in a value
- summary – the name of the API request that we are using
- & – an indicator that there is a second value being passed
- auth=myAPIToken – a key/value pair that Pi-hole is expecting for an API request that requires authentication
With sufficient information about the Pi-hole API, I turned to the MPB communities page noted earlier for the download and documentation links to install the appliance into my lab. Following the steps in the documentation, I deployed the MPB in my lab, accessed it via a browser, and set the admin password with no issues to call out.
The documentation does a good job of explaining the main constructs of the Management Pack that we are going to build, defining the terms Design, Object, Requests, and Relationships. For my example of building a Pi-hole MP, I identified that the Pi-hole server was going to be my Object as I have two of those to work with, and that the summary API request was going to provide enough properties and metrics to have meaningful data for this experiment. This proved mostly true except for the hostname of my Pi-hole server, which will be detailed later.
Using the Creating a Design section of the documentation as a guide, I began a new design. The thing that would have been easier had I understood from the start about the Source section of the design is that portions of it are for testing only, but some of it will become content in the actual MP that you build. I will note those sections below:
- Edit the name from “Untitled Design” to “PiHole Server”
- This will be the name displayed in the Integrations/Repository section of vROps.
- In the Reference Environment Settings section:
- Hostname – 192.168.55.3
- Port – 80
- SSL Configuration – No SSL
- Base API Path – leave blank
- In the Authentication section:
- Authentication Source Type – Custom
- Add a Field
- Label – API token (this will become the prompt for the field where the MP user is prompted to provide their API token when setting up the Adapter)
- Value – myAPIToken
- Sensitive box – checked
This section took me a minute to understand that you are creating a variable, that in my case is called${authentication.credentials.api_token}that you then use later in place of the auth token. This value will become part of the MP
- Nothing in the Global Request Settings section
- Advanced Request Settings
- Add a Query Parameter (this will become part of the MP)
- Key – auth
- Value – ${authentication.credentials.api_token}
- This is copied from the Authentication section above
- Add a Query Parameter (this is only used to validate the Reference environment and will not be carried into the MP)
- Key – summary
- Value – True (the UI requires us to enter a value, even though the API request doesn’t require this)
- Add a Query Parameter (this will become part of the MP)
- Make Request section (this section is only for testing your reference environment)
- HTTP Method – Get
- Test Request Path – admin/api.php
The URL Preview should look like:
http://192.168.55.3:80/admin/api.php?auth=%24%7Bauthentication.credentials.api_token%7D&summary=true
This should look very much like the test we performed earlier, except for our token being replaced by the variable %24%7Bauthentication.credentials.api_token%7D
When you click the Test button you should see a green box that says, “Successfully connected” and a Check Response link that when you click it displays the results of the summary request. If you don’t get data successfully returned here, compare the URL Preview very carefully to the URL you tested earlier to identify the difference.
With a Source section successfully tested against our reference environment, we move to the Requests section of the design. As the documentation describes, this is where we define the API requests that we need to collect the data that our MP uses. We are going to create two requests, one named “summary” and one named “hostname”. Let’s work through these one at a time.
We determined early on that the summary API request was going to return most of the data that we would use in our MP. And we used it in our Source section to test our reference environment. If you looked at the results of the summary request carefully, you would note that the results do not include the actual hostname of your Pi-hole server. And in fact, there is not an API request that will return the name of your Pi-hole server. If we only have one Pi-hole server this wouldn’t be a horrible problem in vROps, but if we have multiple servers that we want to monitor, there’s not a reliable value to identify which server is which. So, Brian came up with the following clever solution that requires a script to be created on each Pi-hole server but then allows the hostname of the server to be collected:
- SSH to your Pi-hole server with a privileged account (in my case “pi”) with the password that you set on that account
- Create a new file /var/www/html/get-hostname.php with the following content:
<?php echo '{"hostname":"' . gethostname() . '"}'; ?>
If you’re not comfortable with linux commands, you could copy or type the following to create the get-hostname.php file:
- sudo nano /var/www/html/get-hostname.php
- this creates the file and opens it in the nano editor
- paste the line of code from above
- Ctrl+X to Exit
- Press Y to save the modified buffer
- Press Enter to write to the file
With this file created, we can go back to the MPB UI and define the first request that will return data for our MP by clicking the Add Request button then:
- Change the name from API Request to hostname
- Chain from another API request – no change
- Resource Path
- get-hostname.php
- Advanced – no change
- Get data
With an HTTP Method of Get, the Preview should look like http://192.168.55.3:80/get-hostname.php and when you click the Request button, should return your Pi-hole server name. We can now click Add Request to create our second request.
- Change the name from API Request to summary
- Chain from another API request – no change
- Resource Path
- admin/api.php
- Advanced
- Body and Headers – no change
- Query Parameters
- First Parameter
- Key – summary
- Value – true
- Second Parameter
- Key – auth
- Value – ${authentication.credentials.api_token}
- This is the variable that we defined in the Source section
- First Parameter
- Get data
With an HTTP Method of Get, the Preview should match what we saw in the Source section and when you click the Request button, should return a dataset.
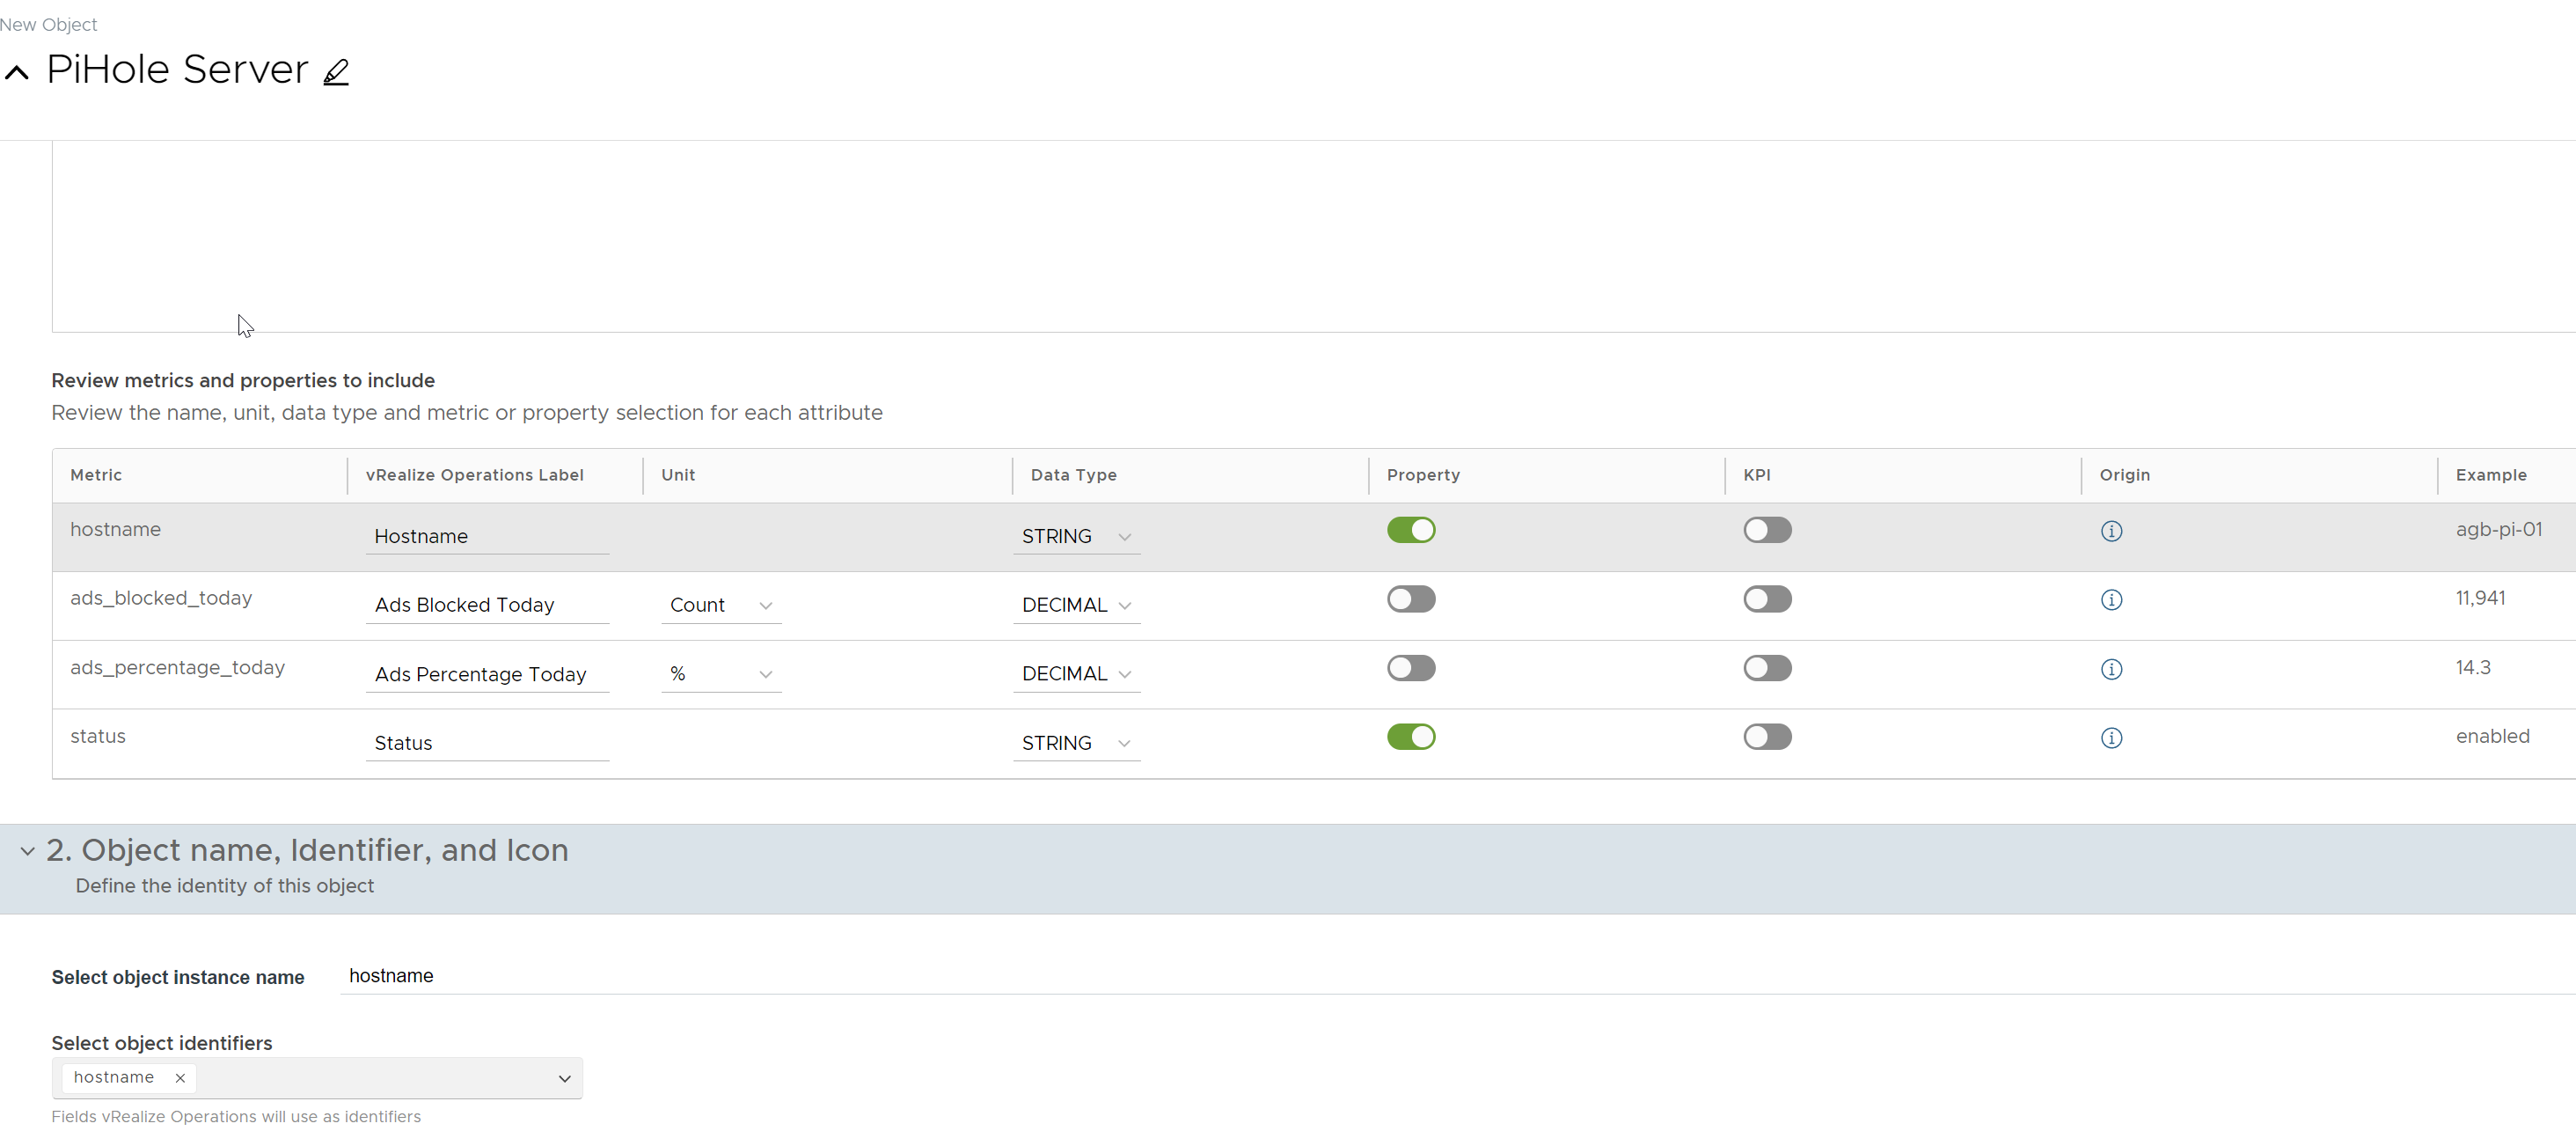
Now that we have defined the Requests, we move to the Objects section of our design where we can select the data from the API requests that we’d like to include in our MP. Click the Add New Object button and populate it as follows:
- Change the name to PiHole Server
- Metrics and Properties from API Request
- Click the << next to summary and select the metrics that you’d like to collect with vROps. Note as you hover over the names, you will see a value that was obtained when you tested the request in the previous section. At a minimum I would suggest:
- ads_blocked_today
- ads_percentage_today
- status
- Click the << next to hostname and select ‘hostname’
- Scroll down and make the following changes to the chart:
- Hostname – leave as is
- ads_blocked_today
- disable Property
- Set Data Type to DECIMAL
- Set Unit to Count
- ads_percentage_today
- disable Property
- Set Data Type to DECIMAL
- Set Unit to %
- Status – leave as is
- Click the << next to summary and select the metrics that you’d like to collect with vROps. Note as you hover over the names, you will see a value that was obtained when you tested the request in the previous section. At a minimum I would suggest:
- Object name, Identifier, and Icon
- Select object instance name – hostname
- Select object identifiers – hostname
The results will look as follows:
There are no Relationships to define, and we are not going to create any Events for this example so we can select the Configuration section where we can review and modify MP version as well as labels and default values for various fields. With this information complete, click the Save button near the top of the Design then click the Build button. Review the Identifiers and Properties and since we didn’t define Relationships or Events, click Next. Click the Perform Collection button to collect sample data and review the Collection Summary to ensure the results were as expected then click Next. Lastly, click the Build button to create the MP. Look for the Build succeeded message then click the Go to build link. Click the name/version of the MP which is a link that will start the download of the .pak file. Save this file and you are now ready to import it into vROps.
Installing the resulting .pak file is done like any other MP, from Data Sources / Integrations / Repositories with the exception that you will have to check the box to “Ignore the PAK file signature checking” as this MP is not signed. Once the MP is installed, you add an Account for each of your Pi-hole, which will include adding Credentials to vROps that is the API token for your server. Before long, you too can track your Pi-hole performance in vROps.

I’d love for you to leave a comment below with what other apps you build a management pack for.
Pingback: Leveraging VMware Aria Operations for Power Consumption Tracking | Enterprise Admins.org