In a previous post, I described setting up a docker host for some containers that I need to run in a lab. This post will focus on a couple of those containers and how I use them.
One service that I need from time to time is a simple SMTP server. I could be configuring a vSphere Alarm Definition, creating a vROps Alert, or testing out a script that sends an email. I don’t really need a full featured email solution, I just want a destination to send email and an easy place to view those messages to see how they look. The best container I’ve found for this is Inbucket. It is an SMTP target with a web interface to monitor incoming messages. Here is a simple screenshot of an email that was successfully delivered and the short line of PowerShell that sent the message:

To get this container running I only need to type a single command (listed below on multiple lines for readability):
docker run --detach \
 --name inbucket \
 --publish 9000:9000 --publish 25:2500 \
 --restart always \
 --env INBUCKET_STORAGE_RETENTIONPERIOD="8h" \
 inbucket/inbucket
This command runs Inbucket in the background, listens on port 25 (for incoming email), displays the output on a web interface at port 9000, and deletes any messages after a super short 8 hour retention window. This is perfect for my requirements.
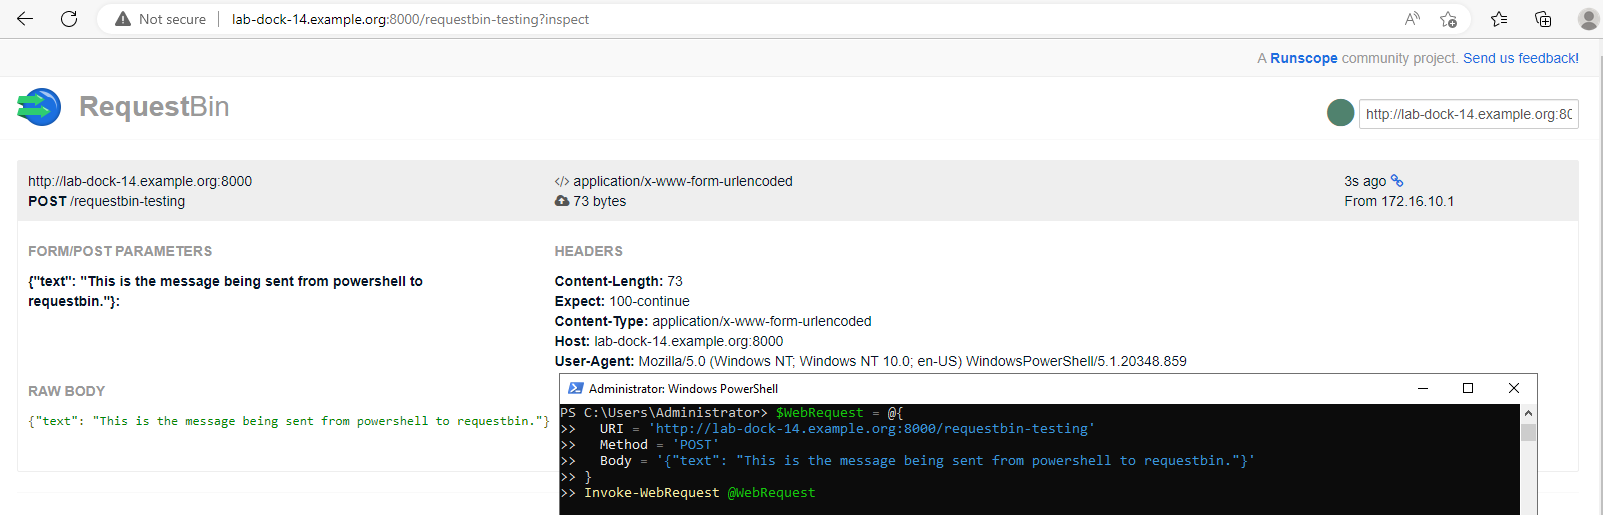
Another service that I found useful is RequestBin. Very similar to the above email example, I have needed to inspect a webhook payload coming from something like vROps or Log Insight. I once incorrectly formatted a JSON message body, it reached my webhook endpoint, and then nothing happened. It took some time before I realized what I had done, but if I would have been able to see the webhook body it would have been much easier. RequestBin has an online service that you could send your payload to, but is also available as a container that can run locally. Again we can start this container with one line:
docker run --detach \
 --name requestbin \
 --publish 8000:8000 \
 --restart always \
 weshigbee/requestbin
This creates a webserver listening on port 8000 that we can post to and then view the output. This clearly displays the raw body of the post which can be useful in troubleshooting.
These are the two containers that I find myself using most often in a lab. One other container that I’ve setup recently is nginx-proxy-manager. I didn’t really _need_ this, but wanted to test something using more friendly name/aliases than the above examples that required specific port numbers to be specified. Again, its an easy one line command to get this container running:
docker run --detach \
  --name nginx-proxy-manager \
  --publish 443:443 --publish 80:80 --publish 81:81 \
  --restart always \
  --volume /data/nginx-proxy-manager/data:/data \
  --volume /data/nginx-proxy-manager/letsencrypt:/etc/letsencrypt \
  jc21/nginx-proxy-manager:latest
Once the web interface is up, you can use it to create nginx type configurations. For example. I can create a DNS record for mail.example.org or requestbin.example.org and then define a proxy host for mail.example.org to forward to lab-dock-14.example.org:9000 and requestbin.example.org to forward to lab-dock-14.example.org:8000. This way I can have multiple services listening on different ports, but then let nginx deal with the port mapping so I only have to enter the friendlier host name. Most of the time this isn’t required for my testing, as I can remember the port numbers or likely only need one HTTP container at a time and can just use the default port.
Pingback: Add vRealize Log Insight endpoint to Skyline Collector | Enterprise Admins.org
Pingback: Easy wildcard certificate for home lab | Enterprise Admins.org